
Introduction
We understand your need to have more in-depth integration with us. We’re here to enable and support your system to integrate with Gojek products. We want to help you improve your operational efficiencies by making things easier for you.
Eligibility
It’s currently available for all GoBiz merchants in Indonesia and Vietnam. Other regions will follow soon. If you’re an owner or manager and already be part of GoBiz, then you can have this integration.
Scope
There are required scope(s) depends on which product you want to integrate. Please refer to Pre-requisite section on each product integration.
Getting Started
Pre-Requisites
To utilize this API Documentation, you’ll need to
- Know how REST-APIs works. Understand how to create requests and interpret the response.
- Know how OAuth2.0 works
- Know how to utilise webhooks
Objective
By completing this API Documentation, you should be able to
- Create requests and see responses
- Understand how the APIs work and which API required by your product
- Understand components that need to be built on your system/product to correspond with Gojek API
Base URLs
Sandbox Environment is where you can perform internal end-to-end testing using the GoAuth Staging credentials. Once the testing is completed successfully, you can utilize the Production Environment using the GoAuth Production credentials.
| Type | Sandbox | Production |
|---|---|---|
| OAuth base URL | https://integration-goauth.gojekapi.com/ | https://accounts.go-jek.com/ |
| GoBiz Open API base URL | https://api.partner-sandbox.gobiz.co.id/ | https://api.gobiz.co.id/ |
HTTP Error Handling Notes
Unless specified otherwise, there are two types of HTTP API errors:
- HTTP 4xx: The error is non-recoverable.
- HTTP 5xx: The error is recoverable.
Authentication
Gojek uses standard OAuth2.0 authentication for integration with all of our partners. To complete the authentication process, the client must authorize itself to Gojek OAuth2 server.
Oauth2 credentials contain two parameters
client_idclient_secret
This identification of the client is done through client credentials issued by Gojek.
Pre-Requisite
Oauth2 credentials can be obtained via GoBiz Developer Portal. For detailed step by step please consult this section
How to get token?
We have 2 methods of getting token
| Integration Type | Method to Get Token | When to Use? |
|---|---|---|
| Direct Integration Model | Client Credential grant_type=client_credentials |
You’re a GoBiz merchant, and you want to access Gojek features directly from your own system. |
| Facilitator Model | Authorization Code grant_type=authorization_code |
You’re a facilitator, either you a POS provider or an online order aggregator, and you want to enable Gojek features to your merchants. |
Client Credential (Direct Integration)
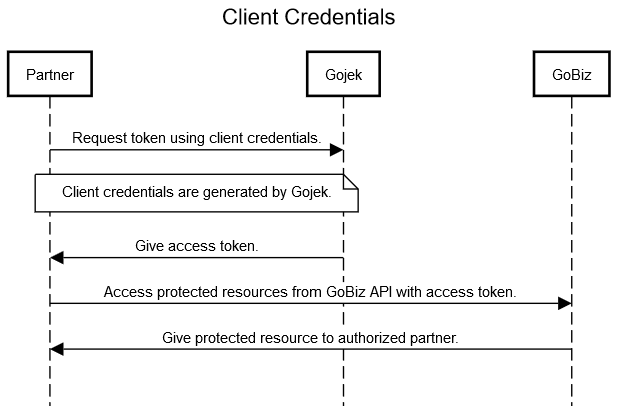
You need to send a request to get access token. Token can be reused until it expired. Token lifespan is 3600 seconds by default. The required authentication parameters must be included in the request header at the time of the request.
Endpoint = {OAuth base URL}/oauth2/token
Request Body Parameters
| Parameters | Type | Required | Description |
|---|---|---|---|
client_id |
string | Yes | Unique identifier issued to the client by Gojek. |
client_secret |
string | Yes | Secret issued to client by Gojek. |
grant_type |
string | Yes | Method to gain the access token. It must be client_credentials. |
scope |
string | Yes | Scope of access to be associated with the resulting access token. |
Sample Request
curl -X "POST" "https://accounts.go-jek.com/oauth2/token" \
     --header 'Content-Type: application/x-www-form-urlencoded' \
     --user 'myclientid:myclientsecret' \
     --data-urlencode "grant_type=client_credentials" \
     --data-urlencode "scope=gofood:catalog:read gofood:catalog:write gofood:order:read"
Sample Response (200)
{
    "access_token": "{access_token_to_access_biz_env}",
    "expires_in": 3600,
    "token_type": "Bearer",
    "scope": "gofood:catalog:read gofood:catalog:write gofood:order:read"
}
Response Body Parameters
| Parameters | Description |
|---|---|
access_token |
The token to access GoBiz endpoints. |
scope |
Space-separated authorized scopes. |
expires_in |
The approximate access_token’s remaining lifetime in seconds since it was issued. |
token_type |
The type of the token. Always bearer. |
See detailed flow and error response on API Reference
Authorization Code (Facilitator Model)
Gojek is using terminology defined in RFC 6749: Section 1.1 - Roles and OpenID Connect Core 1.0 incorporating errata set 1.
| Terms | Description |
|---|---|
| Resource Owner | GoBiz |
| Resource Server | GoBiz APIs |
| Client | Any web-app trying to access end-user’s information from GoBiz |
| Authorization Server | Gojek |
| Integrator | Organization integrating the client with GoBiz |
| User Agent | Interface used to redirect the user to Gojek and back. (i.e., browser) |
| Authorization Endpoint | {OAUTH_URL}/oauth2/auth |
| Token Endpoint | {OAUTH_URL}/oauth2/token |
| Access Token | Token required to access GoBiz APIs |
| ID Token | A JSON Web Token containing information about the user |
Gojek requires integrator to provide redirection URIs (Refer RFC 6749: Section 3.1.2) which will be used for redirecting the user after authorization steps.
Note: Refer OAuth 2.0: Section 2.3.1 - Client Password for more information on client credentials.
OAuth 2.0 and OpenID Connect are complex specifications with a lot of security considerations and implications. We recommend you use a pre-written, battle-tested client library suitable for the language/framework you are using for developing the client application. You can find a listing of such libraries at Code — OAuth (Not maintained by Gojek).
Note: We strongly encourage you to refer OAuth 2.0 Threat Model and Security Considerations to ensure secure integration.
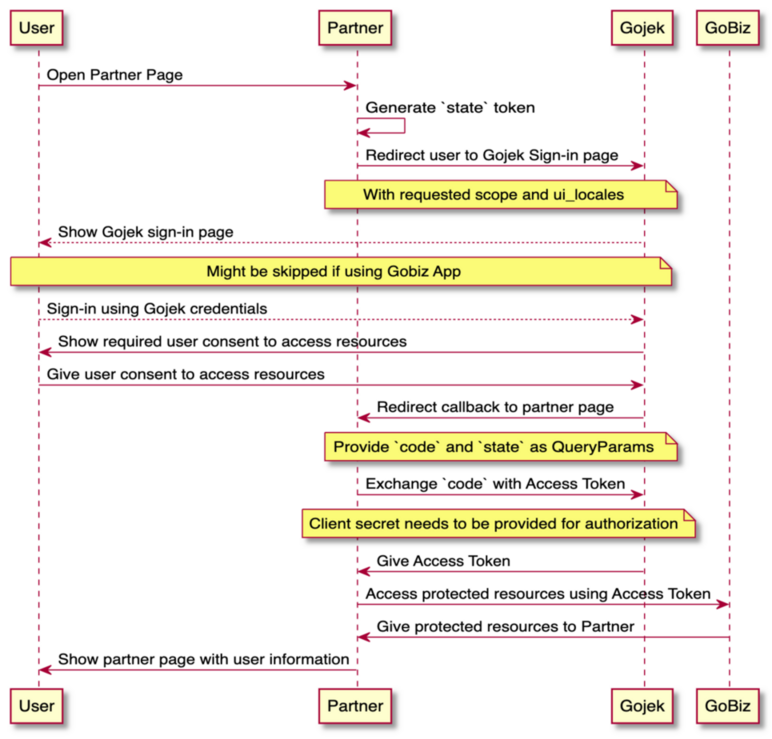
Create anti forgery state token
A state parameter is required for preventing request forgery attacks (Refer RFC 6749: Section 10.12). The state parameter is a unique session token that holds state between the client and the user agent (i.e., Browser). When the user is finally redirected back to the client after successful authentication & consent, client should cross verify this token to ensure the request is coming from legitimate user-agent and not a malicious attacker.
- state must be at-least 8 characters long
- state must be URL-safe encoded
Process authorization callback
Once the user successfully authenticates with Gojek and authorizes the client to access information, Gojek will generate an authorization code and redirect the user to redirect_uri with the code and the state that was originally sent by the client. On receiving this callback, client should verify the state parameter and ensure the value is same as the one sent by the client in previous step.
Exchange code for Access & ID tokens
The code returned in the previous step is one-time use only and is short-lived (Not more than 2 minutes after receiving the redirection). Client should exchange this code with Gojek to receive an access token and id token containing information about the user. A POST request should be sent to /oauth2/token endpoint with following parameters in the request body:
Endpoint = POST {OAuth base URL}/oauth2/token
Request Header
Content-Type: application/x-www-form-urlencoded
Request Body Parameters
| Parameters | Type | Required | Description |
|---|---|---|---|
client_id |
string | Yes | Client identifier issued by GoJek and must be same as the one sent during /oauth2/auth. |
client_secret |
string | Yes | Client Secret issued by GoJek for the client_id. |
grant_type |
string | Yes | Method to gain the access token. It must be authorization_code. |
code |
string | Yes | Value received as part of redirection to redirect_uri. |
redirect_uri |
string | Yes | Redirection URI used during the /oauth2/auth call. |
Sample Request
curl -X "POST" "https://accounts.go-jek.com/oauth2/token" \
     --header "Content-Type: application/x-www-form-urlencoded" \
     --data-urlencode "client_id=partner-client-id" \
     --data-urlencode "client_secret=partner-client-secret" \
     --data-urlencode "grant_type=authorization_code" \
     --data-urlencode "code=value-from-oauth-callback-queryparams" \
     --data-urlencode "redirect_uri=partner-redirect-uri"
Sample Response (200)
HTTP/1.1 200 OK
Content-Type: application/json;charset=UTF-8

{
    "access_token": "{access_token_to_access_biz_env}",
    "expires_in": 3600,
    "id_token": "{id_token}",
    "scope": "offline email openid gofood:catalog:read gofood:catalog:write",
    "token_type": "bearer"
}
Response Body Parameters
| Parameters | Description |
|---|---|
access_token |
The token to access Biz endpoints |
scope |
Space-separated authorized scopes |
expires_in |
The approximate access_token’s remaining lifetime in seconds since it was issued |
token_type |
The type of the token. Always bearer |
id_token |
ID token |
refresh_token |
The refresh token, used to refresh the access token when expired. |
Refreshing Access Token
When the access token expired, partner can request for new access token, given the refresh token available.
Endpoint = POST {OAuth base URL}/oauth2/token
Request Header
Content-Type: application/x-www-form-urlencoded
Request Body Parameters
| Parameters | Type | Required | Description |
|---|---|---|---|
client_id |
string | Yes | Client identifier issued by GoJek and must be same as the one sent during /oauth2/auth. |
client_secret |
string | Yes | Client Secret issued by GoJek for the client_id. |
grant_type |
string | Yes | Method to gain the access token. It must be refresh_token. |
refresh_token |
string | Yes | Token to refresh the expired access token. |
Sample Request
curl -X "POST" "https://accounts.go-jek.com/oauth2/token" \
     --header "Content-Type: application/x-www-form-urlencoded" \
     --data-urlencode "client_id=partner-client-id" \
     --data-urlencode "client_secret=partner-client-secret" \
     --data-urlencode "grant_type=refresh_token" \
     --data-urlencode "refresh_token=refresh-token"
Sample Response (200)
HTTP/1.1 200 OK
Content-Type: application/json;charset=UTF-8


{
    "access_token": "{access_token_to_access_biz_env}",
    "expires_in": 3600,
    "id_token": "{id_token}",
    "scope": "offline email openid gofood:catalog:read gofood:catalog:write",
    "token_type": "bearer"
}
Response Body Parameters
| Parameters | Description |
|---|---|
access_token |
The token to access Biz endpoints |
scope |
Space-separated authorized scopes |
expires_in |
The approximate access_token’s remaining lifetime in seconds since it was issued |
token_type |
The type of the token. Always bearer |
id_token |
ID token |
refresh_token |
The refresh token, used to refresh the access token when expired. |
Introducing GoBiz Developer Portal
Now, you can do a self-serve integration with our API thru GoBiz Developer Portal. GoBiz Developer Portal is a portal for developers to configure and manage their GoBiz API integration including setup sandbox credentials, managing testing outlets, and other features independently.
Currently, GoBiz Developer Portal only support GoFood API for GoFood merchants who want to integrate host-to-host with GoFood API through GoBiz API (Direct Integration) ; if you’re a POS (Point of Sales) or OFA (Online Food Aggregator), please go directly to Facilitator Model
Please note that before using GoBiz Developer Portal, you need to be an existing GoBiz user, and use your owner role in order to access Developer Portal. If you’re not an existing GoBiz user yet, you need to register yourself first via this link https://gobiz.co.id/daftar
Check out this video to understand more about GoBizDevPortal
Login to GoBiz Developer Portal
You can log in to GoBiz Developer Portal from the login button on the top-right menu

After clicking the login button, you will be redirected to the GoBiz Developer Portal login page. Use your existing GoBiz owner email and password (if you’re unsure about which email address with owner role, check your user roles on GoBiz Dashboard > Account > Profile > User Profile)

Once you successfully log in, you will be redirected to the main page of the GoBiz Developer Portal where you can start to create integration.
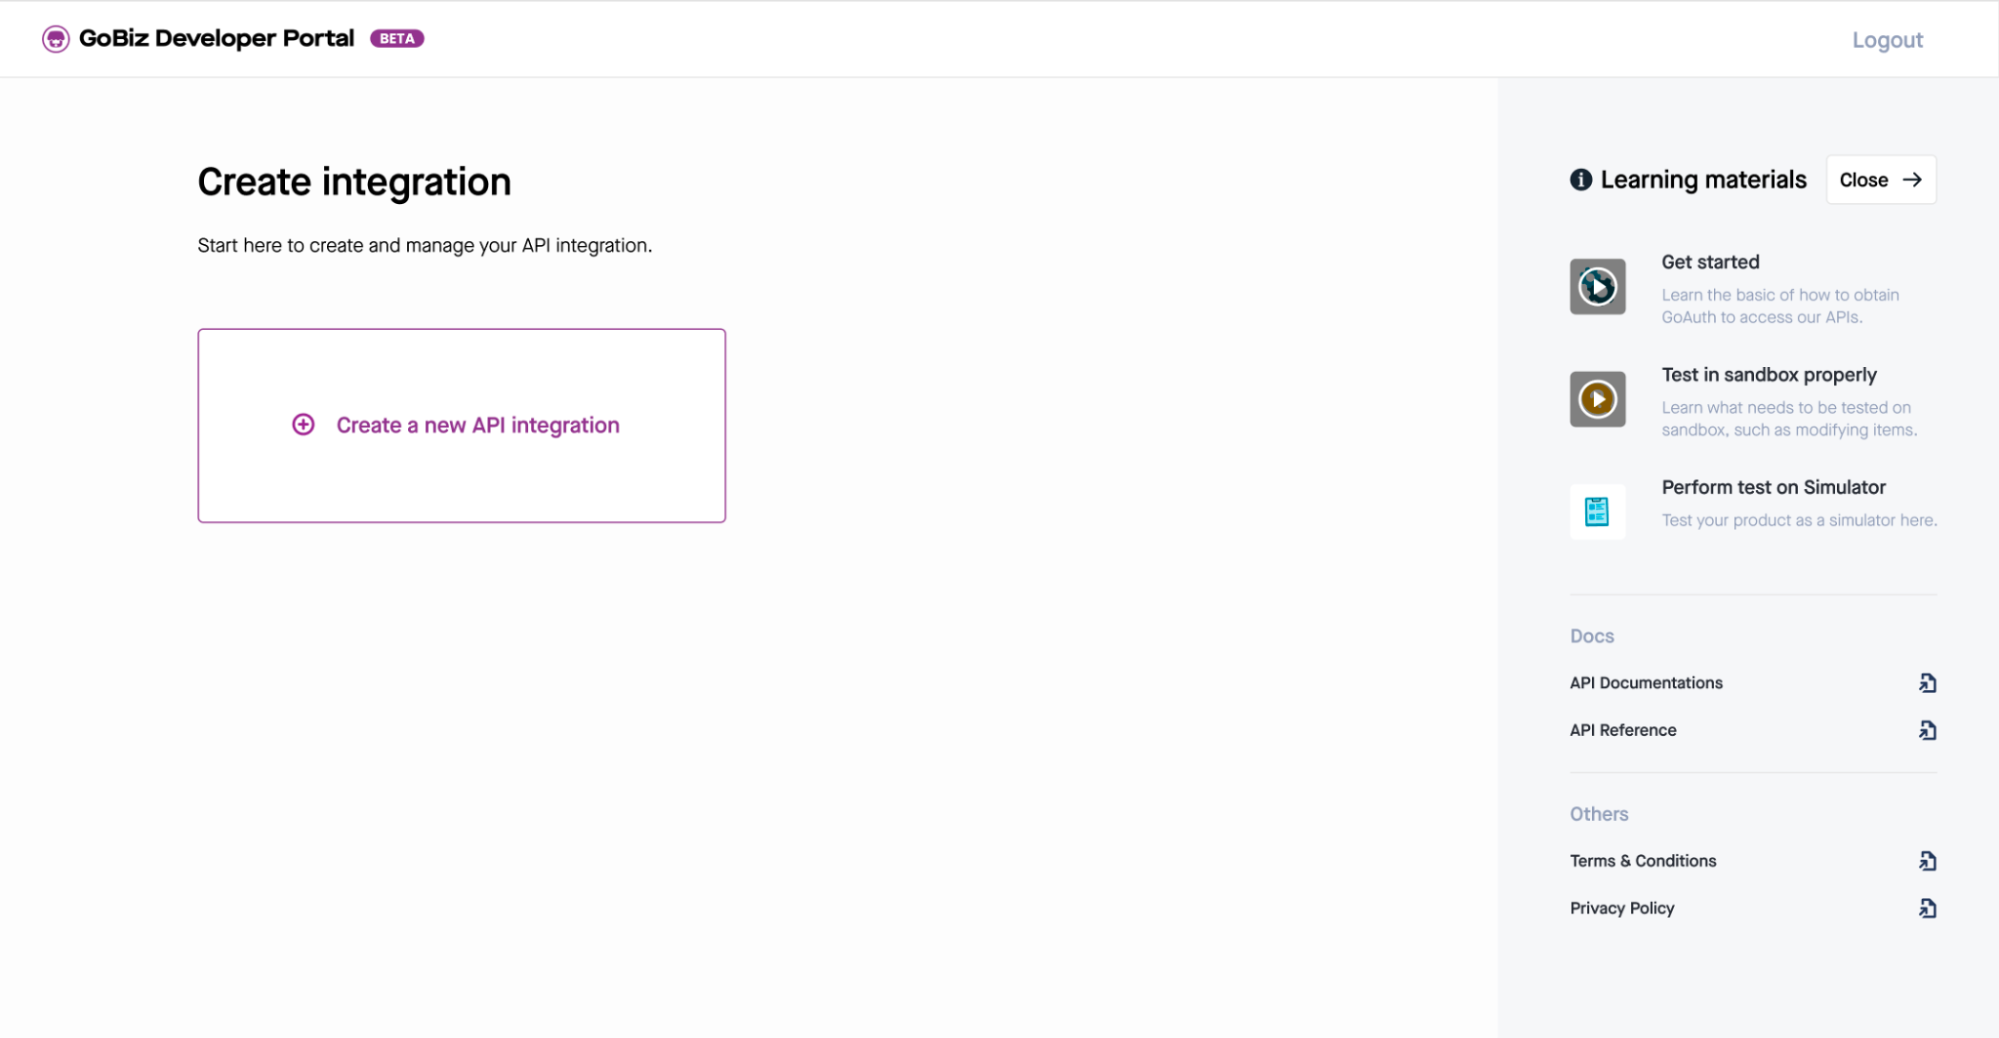
Setup Sandbox Credential
To start your integration, click on Create a new API integration on the main page
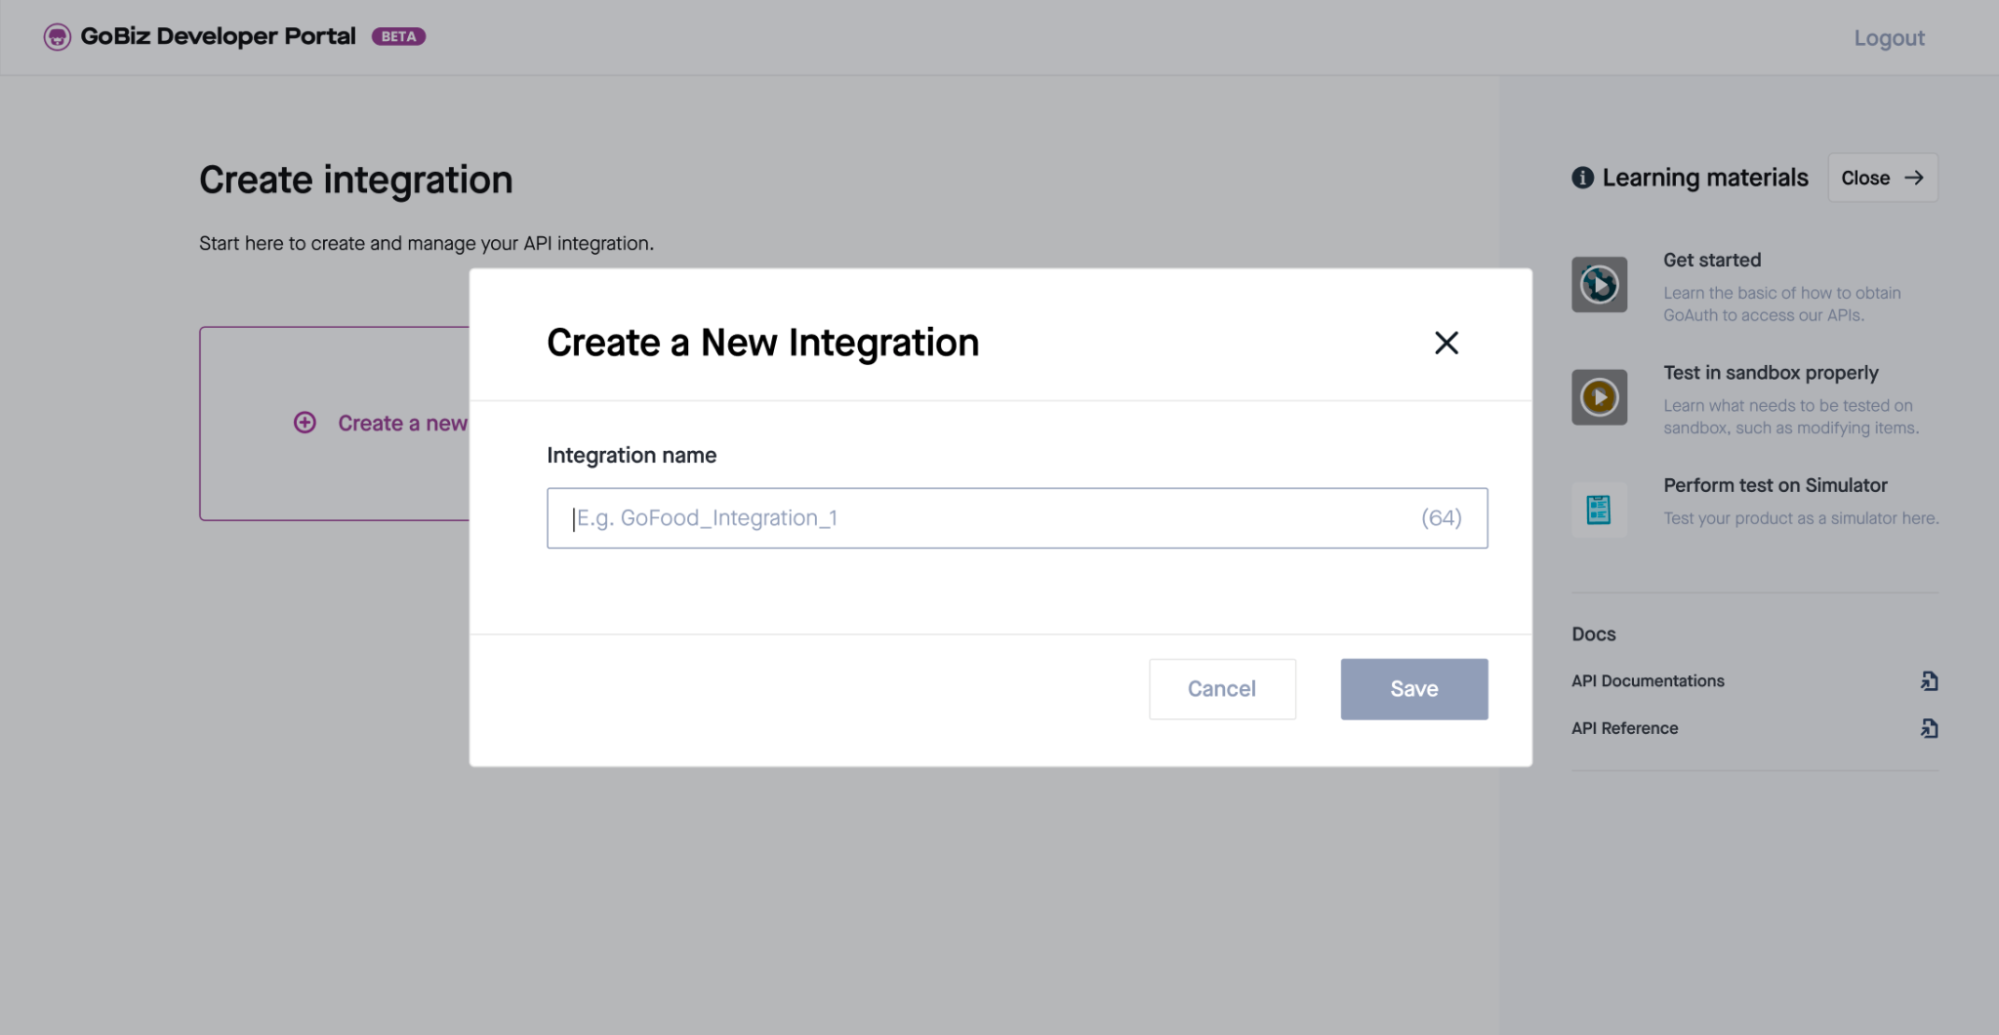
Fill in the integration name according to your preference, then click Save

You will be redirected to the credential & scope page where you can generate your App ID/client_id and Secret/client_secret for you to start integrating with GoBiz API. Click the button to obtain your credentials
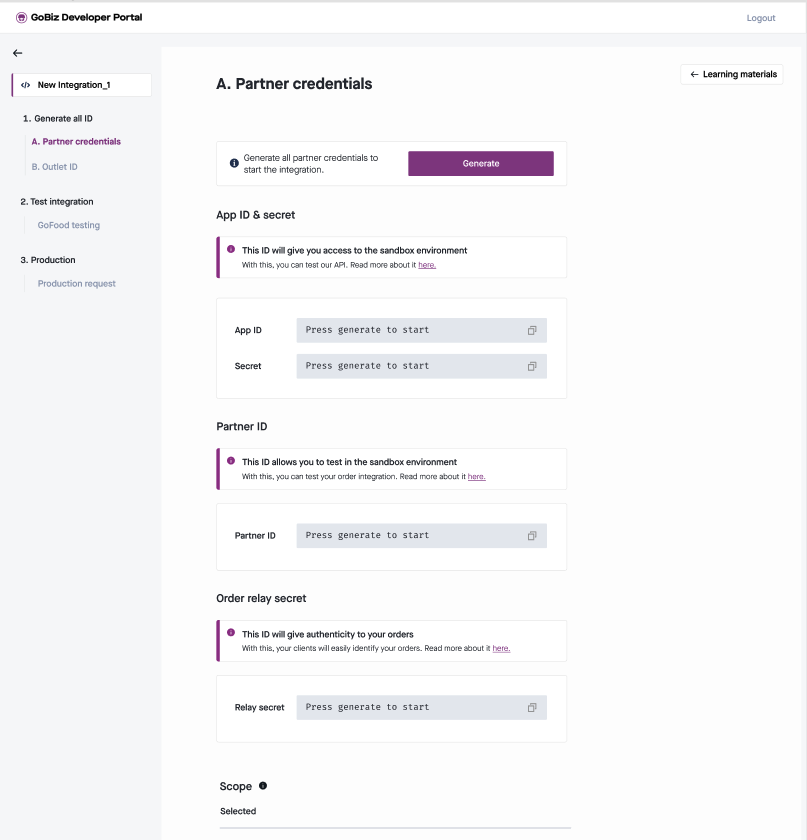
Once you clicked Generate App ID & Secret, you will receive your App ID & Secret.
Please store your App ID & Secret safely.
After your App ID & secret is successfully created, you’ll have a credential with all scopes required for your GoFood direct integration.

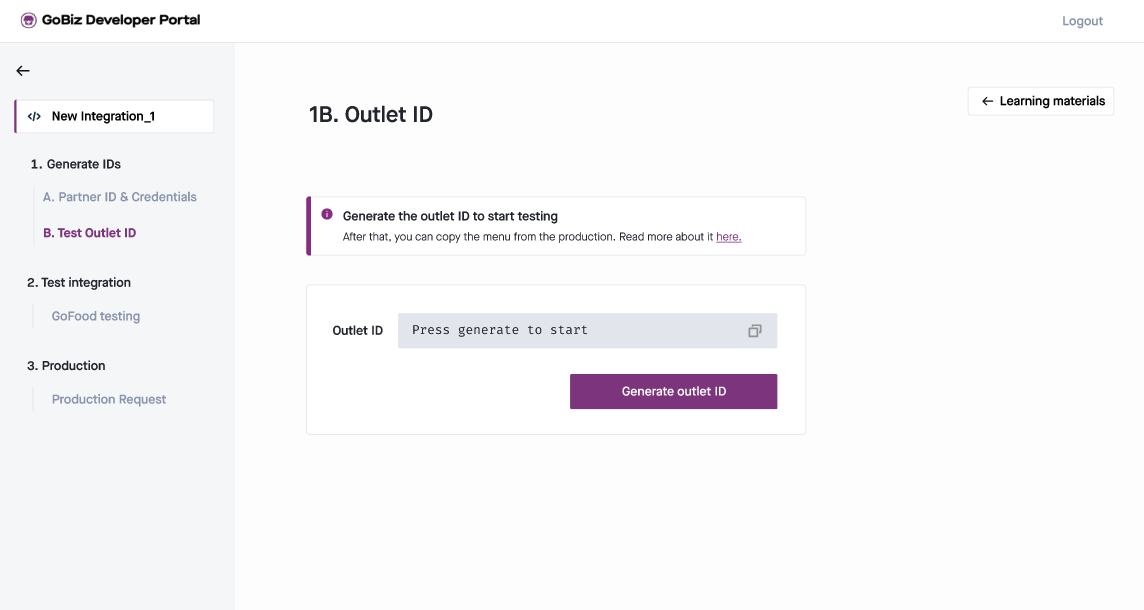
Setup Testing Sandbox Outlet
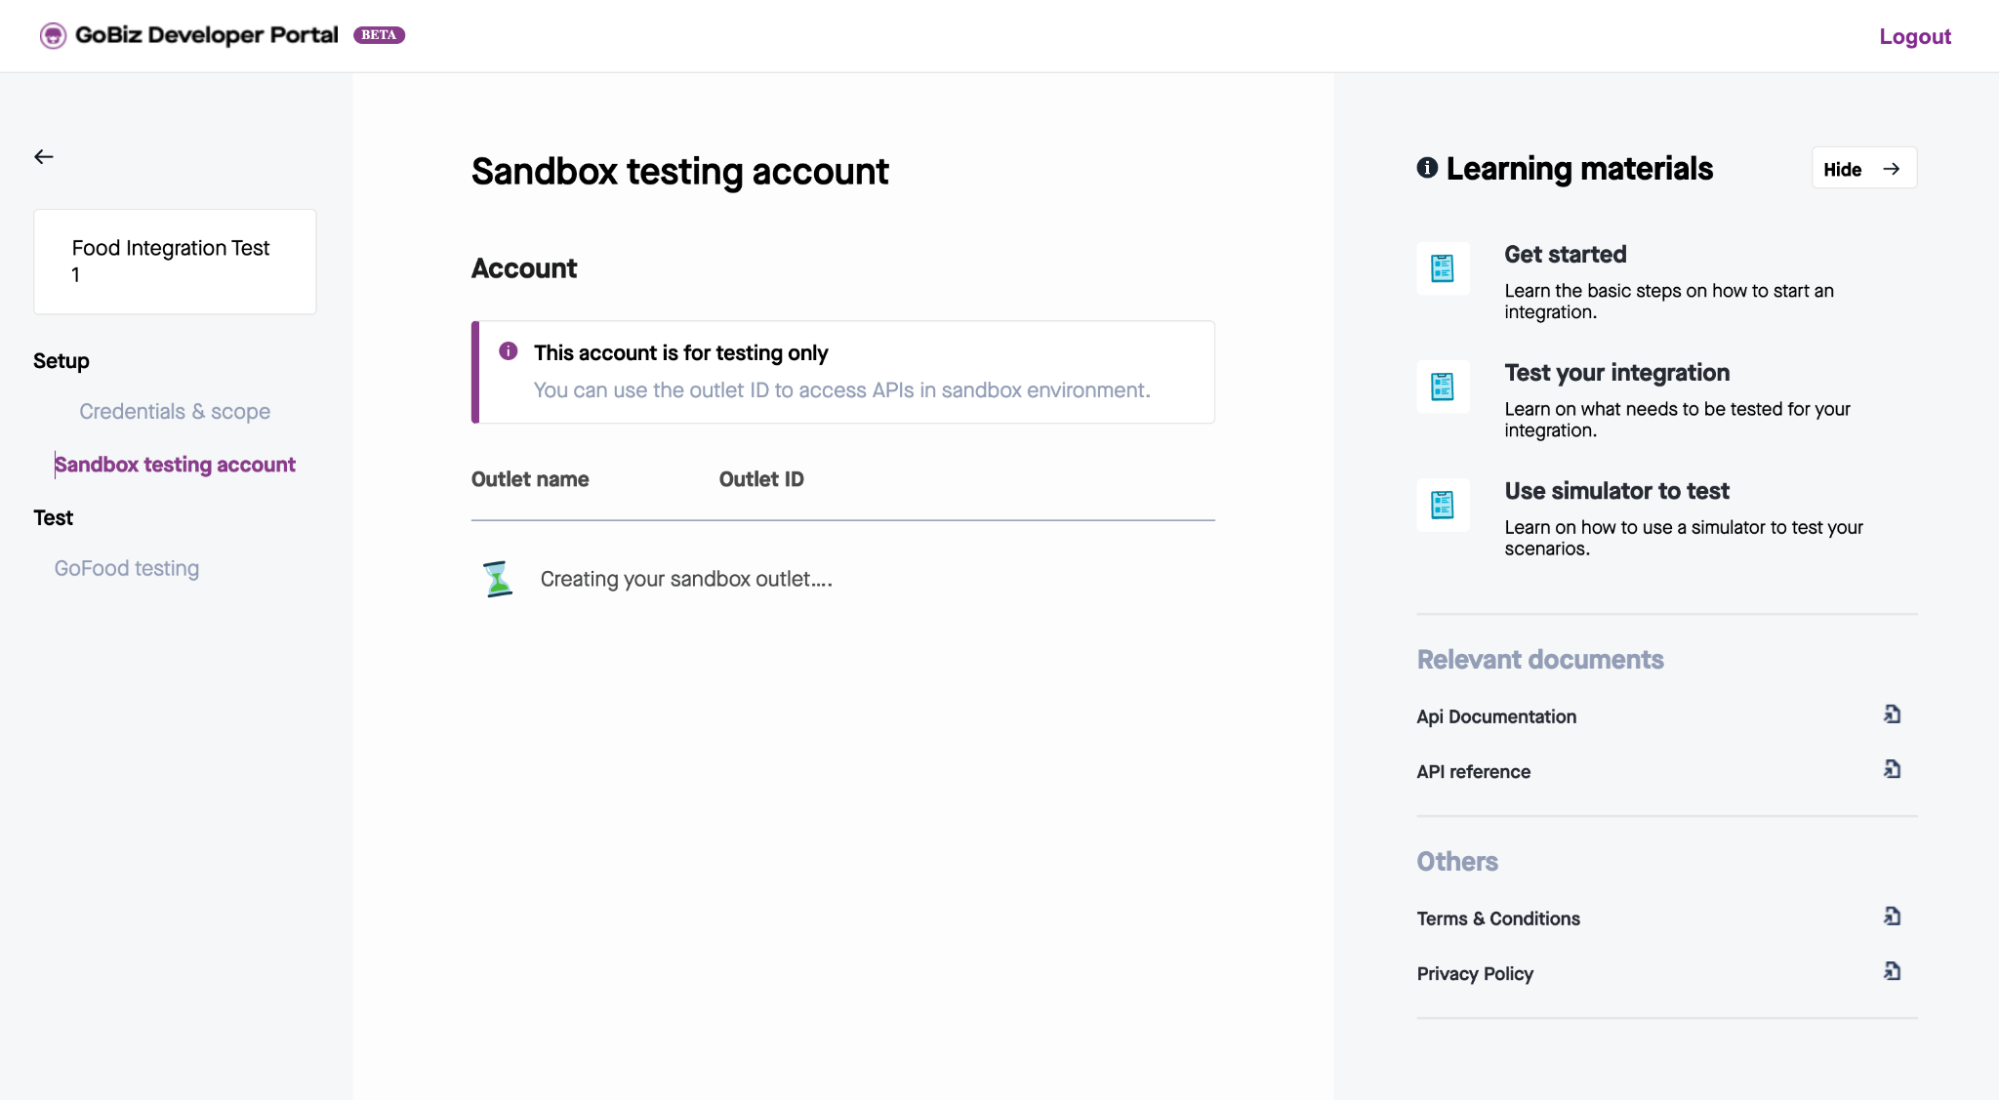
This step covers how to set up your sandbox test account for your integration. Go to Sandbox Test Account to start configuring your testing account. Click the Start here to set up your sandbox testing account. We will prepare your test account with the menu from your main outlet.
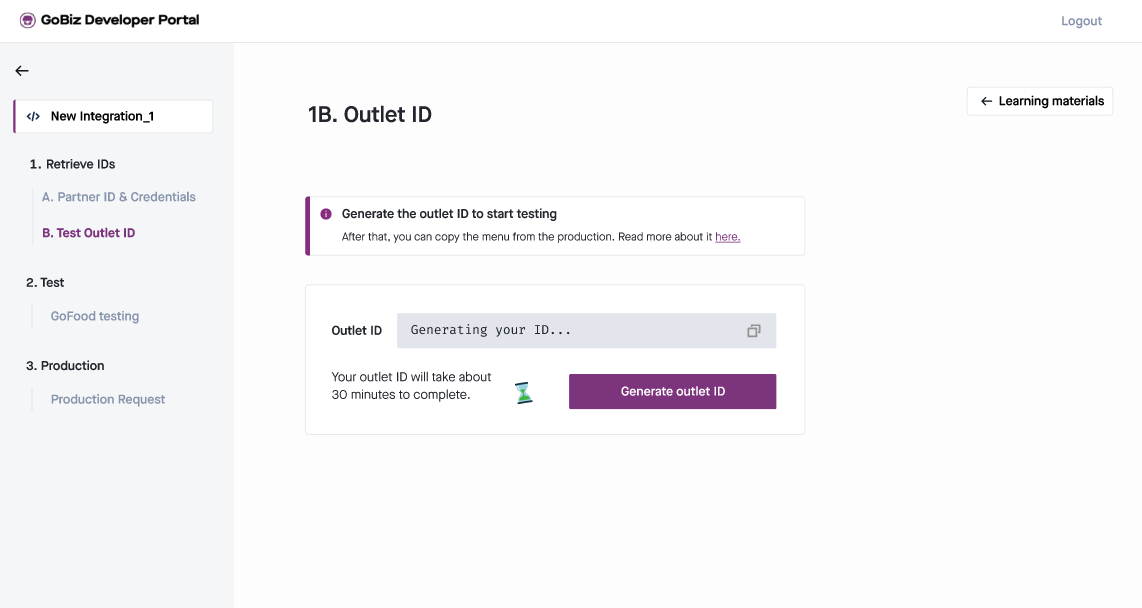
Once you successfully click Start here, our system will create a testing account so you can use it to perform testing in Sandbox. Please note that this process can take a while , you might need to refresh the browser periodically to check if the process is already completed.
When test account creation is completed, you should be able to see your sandbox test account with the “Outlet ID”. Please copy and save this outlet id, you will use it many times during your integration testing.
You can continue to copy your menu by clicking on Copy Menu
Please make sure that you have active GoFood product + Menu items on your GoBiz account. unless you have it, you will not be able to fetch your menu.

Fetching menu can take sometimes to complete, you can check it periodically by clicking on Refresh data button
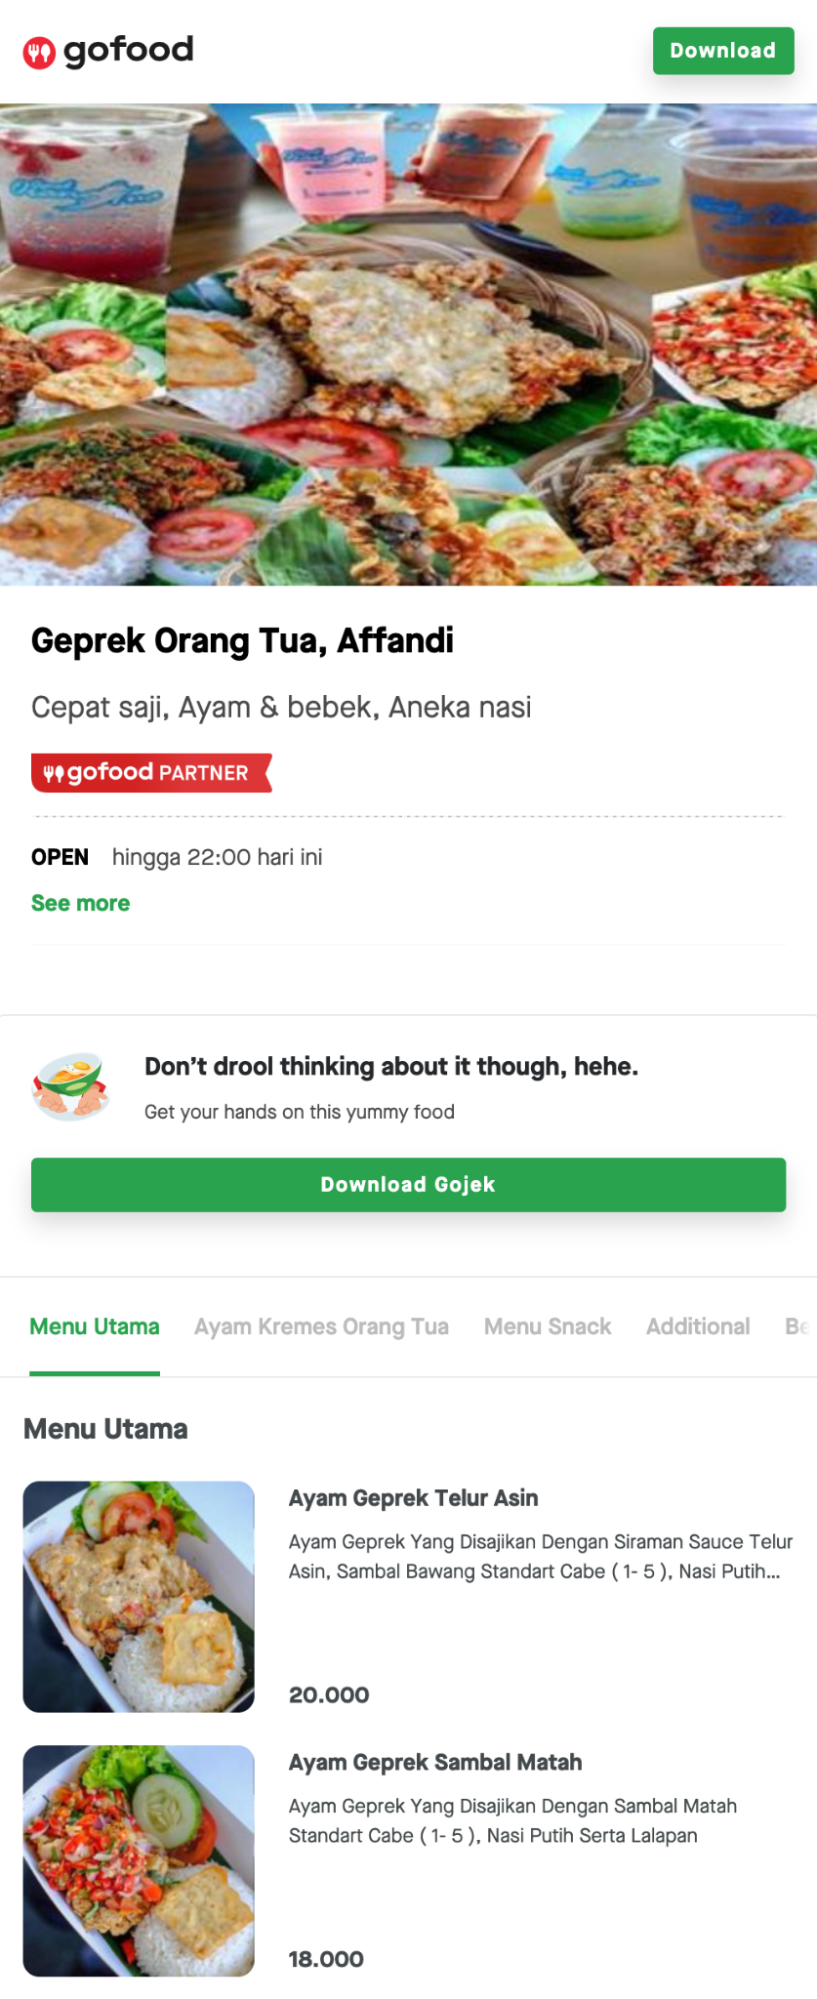
When the fetching menu is completed, you’ll see the Menu button available. Click on it to see how your menu looks like. This page is responsive, so you can see how your menu looks like on mobile view.

Let’s get started!
Food Integration
Direct Integration Model
This section will cover on how to do Direct Integration. Direct Integration model is a host to host integration between GoBizAPI and your system.
By the end of this section, you should be able to obtain
- App / Client ID
- App / Client Secret
- Partner ID
- Outlet ID
Make sure you already obtained those 4 fields from GoBizDevPortal. You’ll need them to start integrating with GoBizAPI.
Test Food Integration
In this section, we’re going to explain how to do the integration using Postman - feel free to use other tools or doing curl directly from your terminal.
Get Access Token
To see how to do authentication for direct integration, please consult this section
Prepare your App ID & Secret that you have obtained from GoBiz Developer Portal and open your Postman application.
How to get access token using Postman
- Use [POST] https://integration-goauth.gojekapi.com/oauth2/token as the endpoint
- On Authorization, choose Basic Auth type
- Input your App ID on the Username
- Input your Secret on the Password
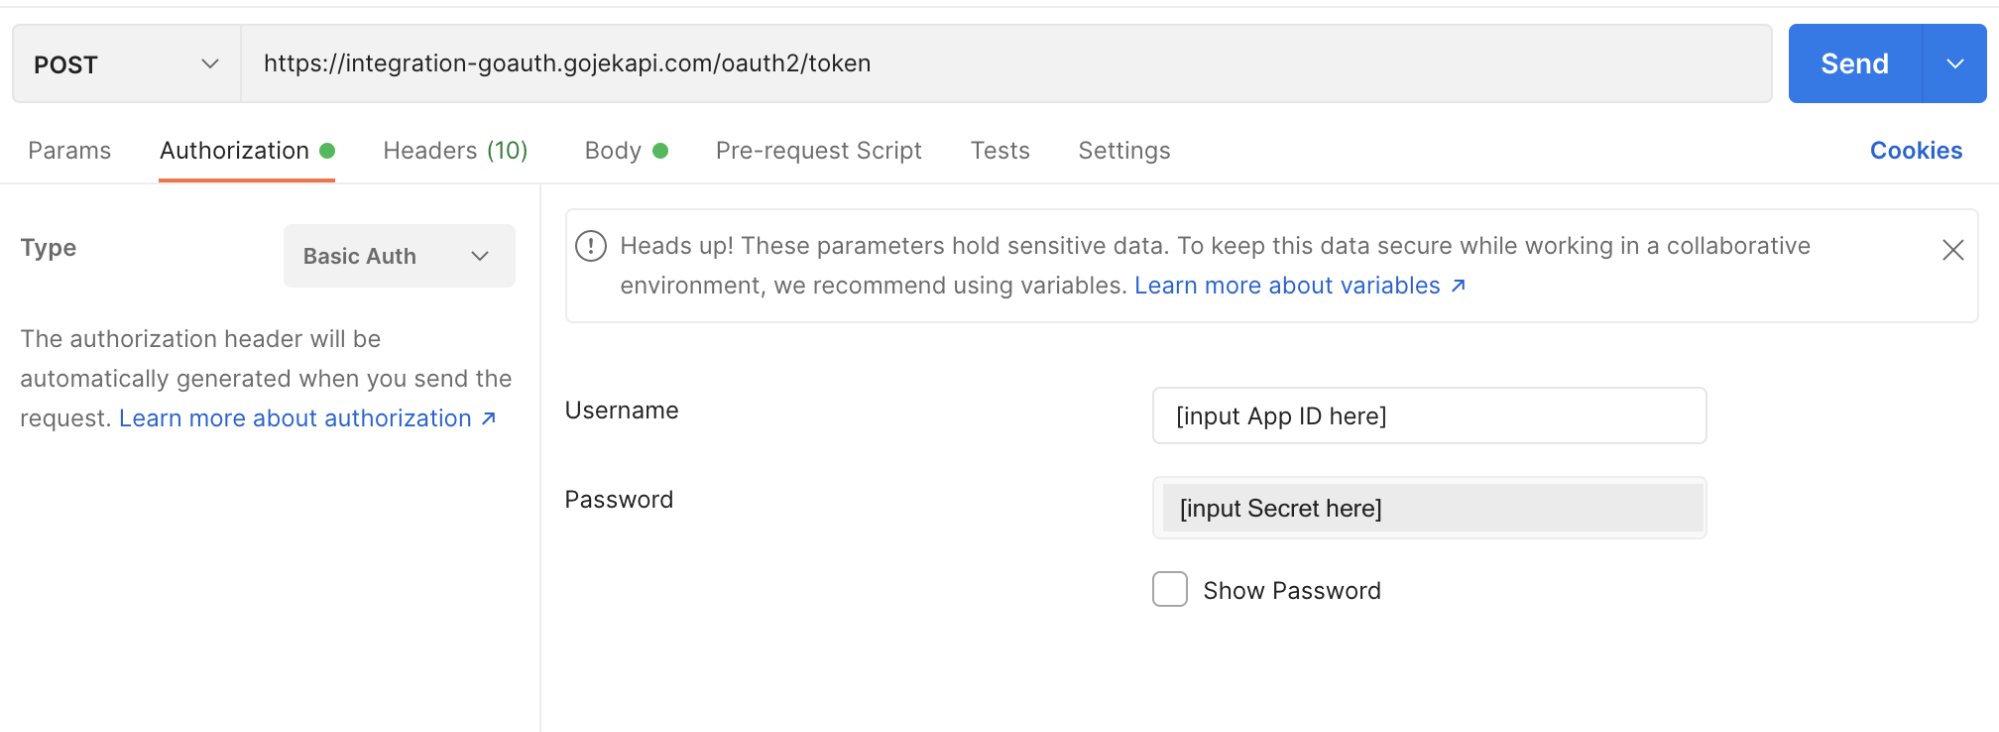
- On Headers, fill in Content-Type value: `application/x-www-form-urlencoded`

- On Body, fill in grant_type value: client_credentials; fill in scope value: gofood:catalog:write gofood:catalog:read gofood:order:write gofood:order:read gofood:outlet:write promo:food_promo:read promo:food_promo:write for GoFood integration scopes.

- Once you complete the configuration, click Send to receive your access_token. This access_token will be used upon performing API functions according to its purpose. The access_token that you receive will be expired in 3599 seconds, once it’s expired you need to perform get access_token again

If you’re not familiar with Postman and want to do
curlinstead, please refer to this API Reference
Setup Sync GoFood Menu
Prior to updating your GoFood menu. You’ll need to familiarize yourself with the GoFood menu structure first.
Get your existing menu
- Use [GET] https://api.partner-sandbox.gobiz.co.id/integrations/gofood/outlets/{outlet_id}/v2/catalog as the endpoint
- On authorization, choose Bearer Token Type and input your access_token value on Token
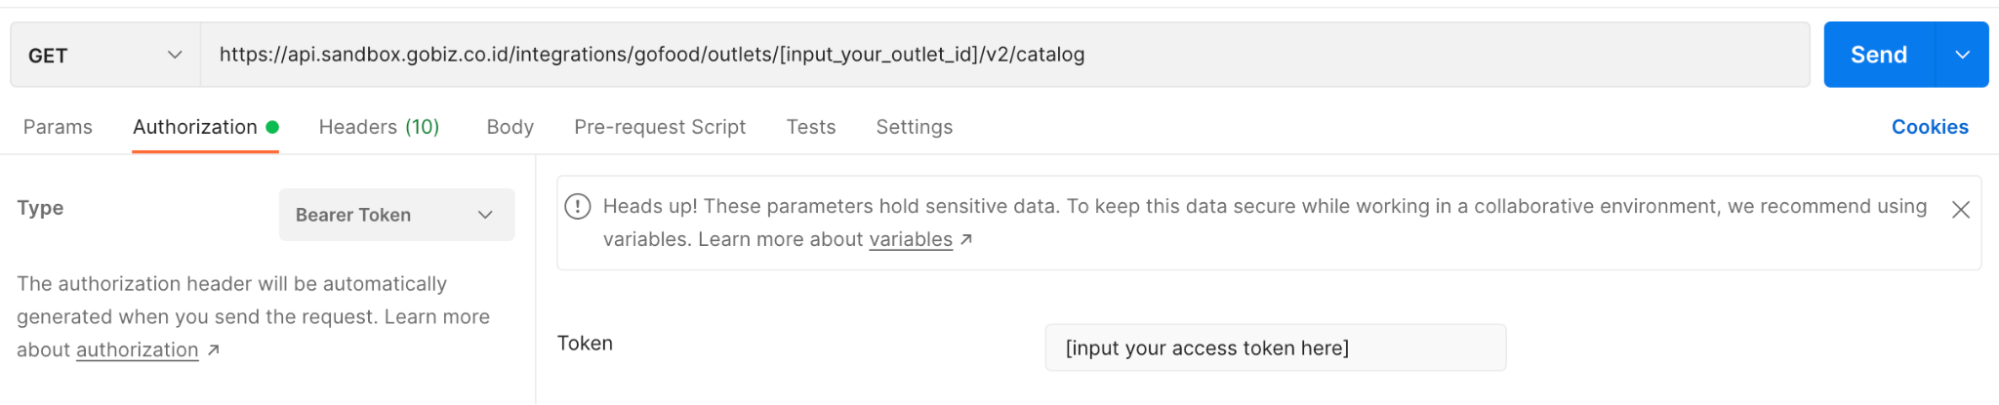
- On Headers, fill in Content-Type value: application/json

- Click Send, if you successfully perform the get menu activity, you will receive all current active menus & variant categories on your existing outlet


Update menu
- Use [PUT] https://api.partner-sandbox.gobiz.co.id/integrations/gofood/outlets/{outlet_id}/v1/catalog as the endpoint
- On authorization, choose Bearer Token Type and input your access_token value on Token
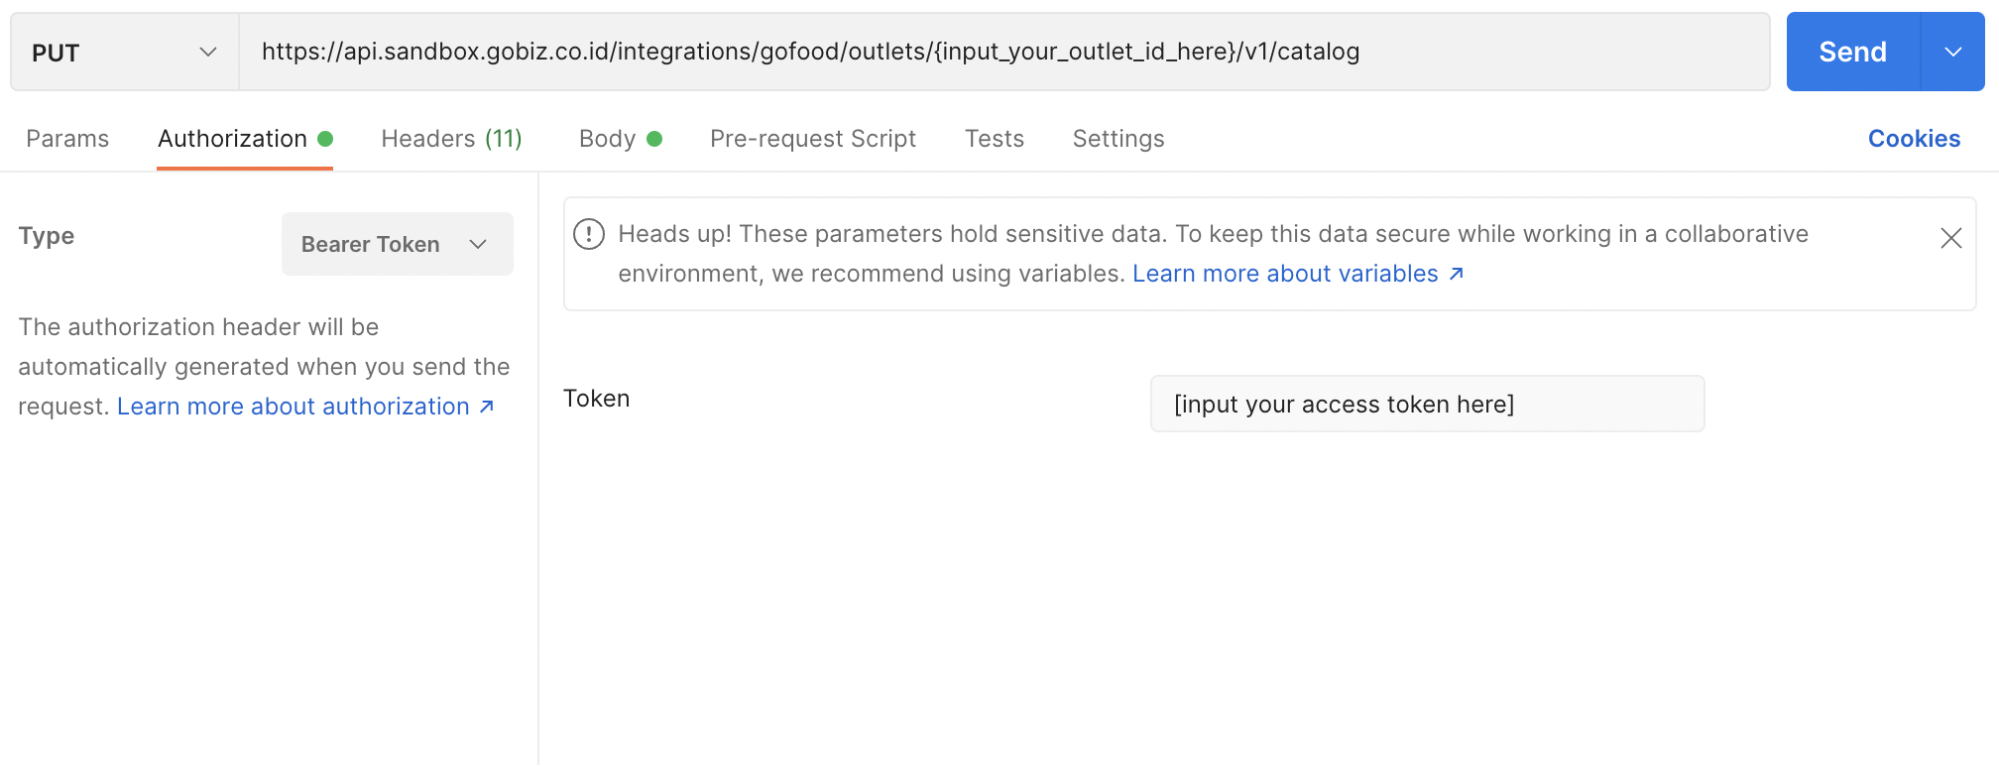
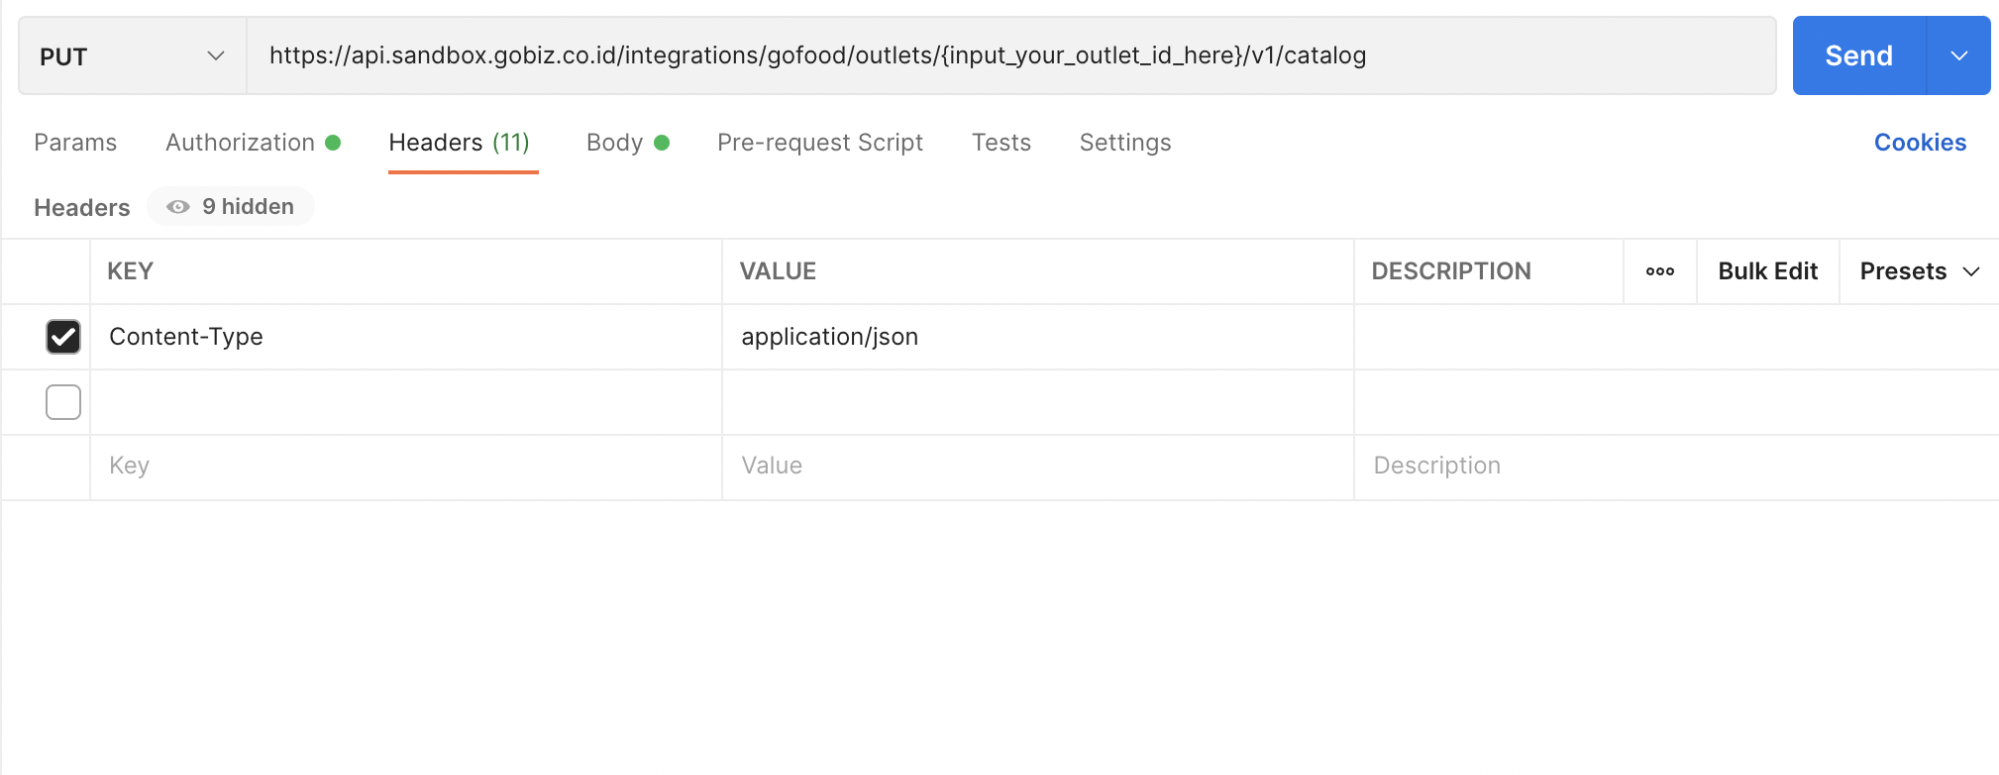
- On Headers, fill in Content-Type value: application/json
- On Body, fill in your menu structure according to your preference, follow this guideline menu-structure and sync-menu

- Click Send, if the menu structure is correct, then you will receive success response from our system and your menu will be reflected on your testing account
Pro Tips
- Check these variables before sending the request
| Variable | Description | Tips |
|---|---|---|
| external_id | Designated identifier to map Gojek item_id and Partner item_id i.eCheese Burger on your system has ID B12345 where within Gojek system ID is eyJhbGciO |
Use alphanumeric char, max 200 characters |
| menus.items.name | The name of the menu item to be shown in Gojek consumer app. Sample: "Refreshing Thai Green Tea" |
Keep it simple but looks appealing to your customer |
| menus.items.internal_name | The name of the menu item to be shown in GoBiz app. Sample: "Iced Thai Green Tea". |
Keep it simple and understandable for your cashier to identify it |
| in_stock | Setting menu item stock as available or not available. It’s a boolean logic (true or false) | |
| price | Menu item price, always inclusive of tax | |
| image | Menu item image, max size 1 Mb with 1:1 aspect ratio | Make sure image URL is publicly accessible and content-type as image/png |
How to use this rule?
"rules": {
  "selection": {
    "min_quantity": 1,
    "max_quantity": 2
  }
}
|
min_quantity The minimum variant that the consumer can select. 0 means that the variant is optional. 1 or more means variant is mandatory, and consumer is required to pick one (or more) variant(s). max_quantity The maximum variant that the consumer can select |
- Check if your menu category and menu items reflected correctly
- Check your menu items price - make sure it correctly reflected
- Check if all menu items has image. Image is critical for your menu item.
- Please make sure you only do menu update over API. Please refrain to update menu manually via GoBiz app once you’re integrated via API ; updating menu manually via GoBiz post-API integration will make your order unrecognizable.
Setup Webhook Notification (Direct)
Webhooks notification is required for your GoFood order acceptance (GoFood orders flowing directly to your system). You are allowed to subscribe to multiple events (depending on your needs). When you’re subscribing to an event (subscription is created) then a Gojek will trigger notification to the URL specified in the notification.
Learn more about notification subscriptions on our API Reference
Please follow this step-by-step instructions on how to subscribe to a webhook notification:
- Use [POST] https://api.partner-sandbox.gobiz.co.id/integrations/partner/v1/notification-subscriptions as the endpoint
- On authorization, choose Bearer Token Type and input your access_token value on Token

- On Headers, fill in Content-Type value: application/json
- On body, fill:
- Event: “[choose an event that you would like to subscribe]” For a detailed notification event list, see this event list
- Url: “[fill in your webhook URL for receiving our notifications]”
- Active: true
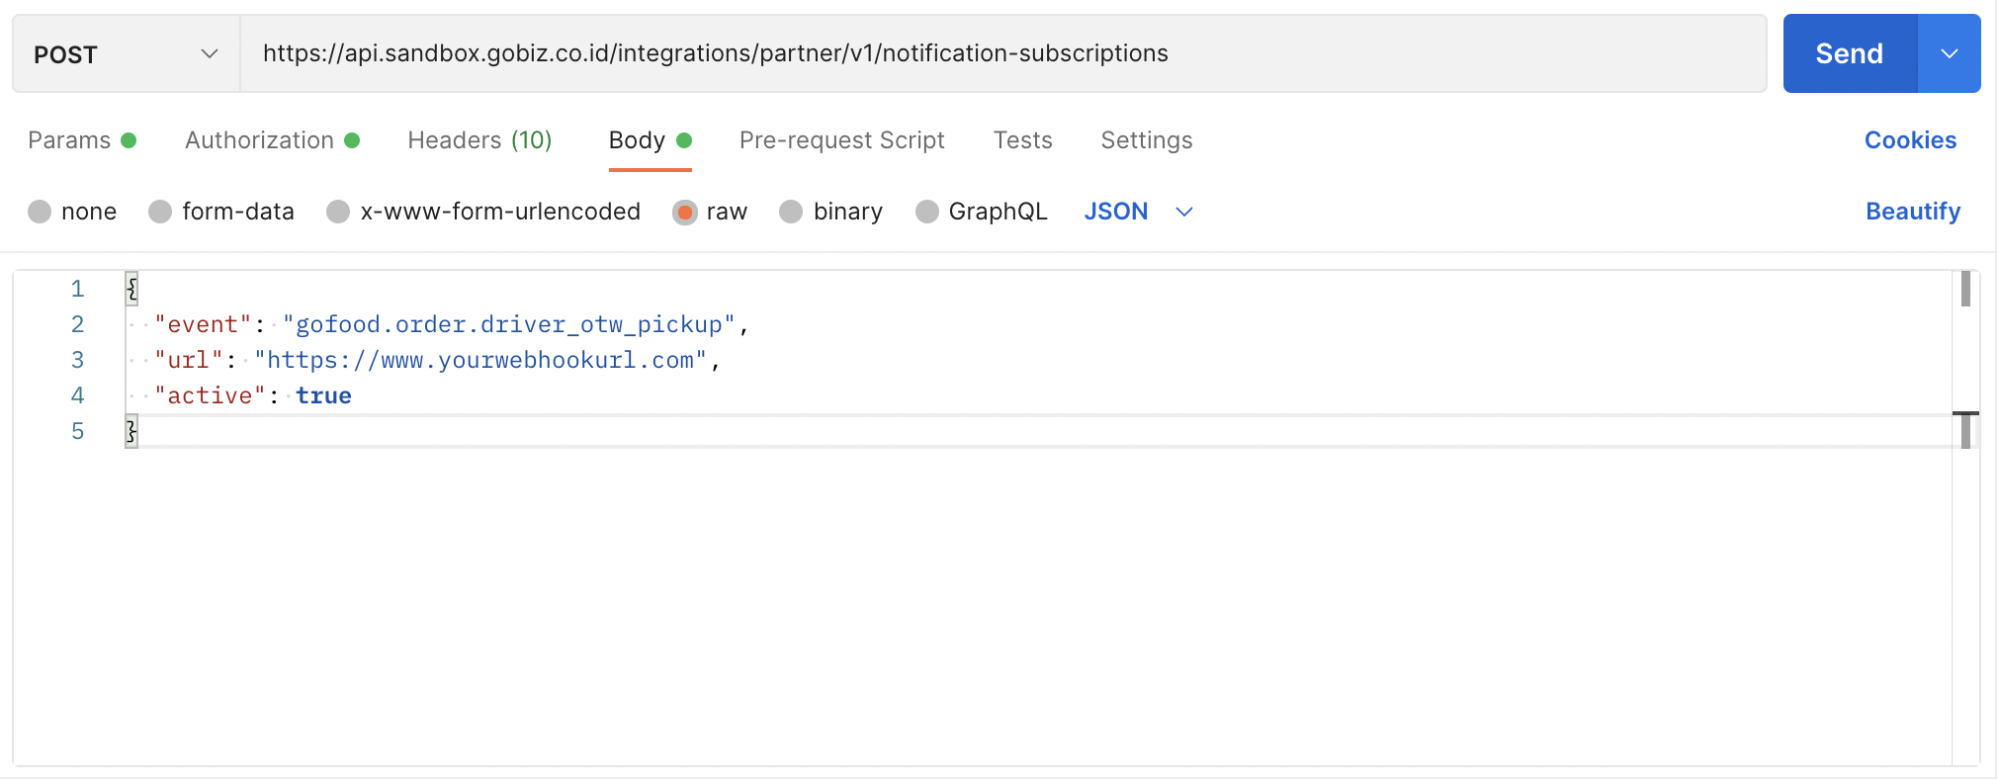
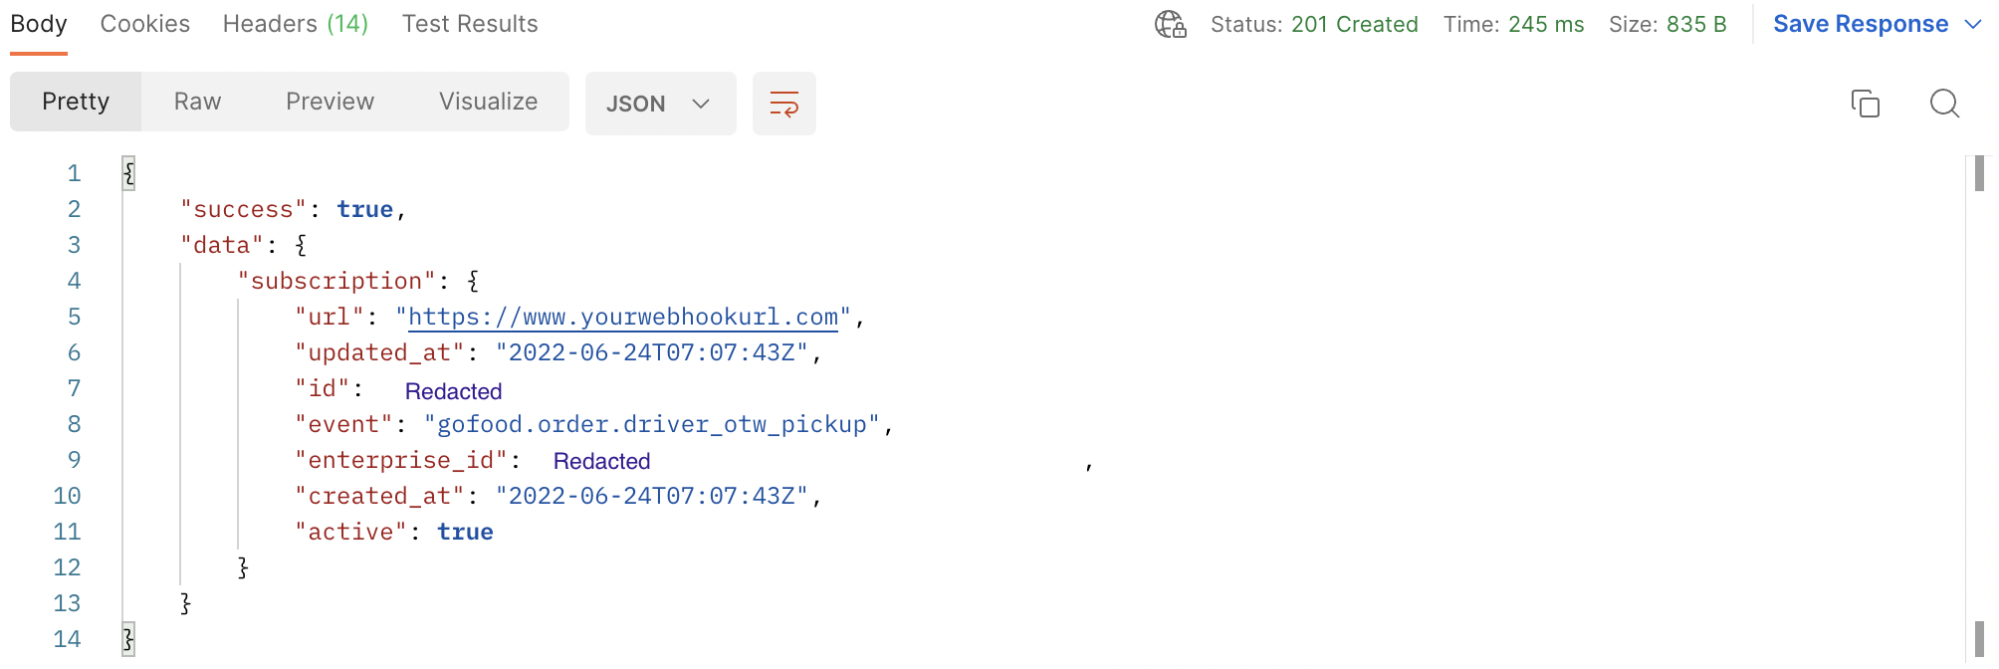
- Send the request, and once it’s successful your event subscription is immediately active
Handle Webhook Notification Error (Direct)
Sometimes webhook notifications might not be sent properly to you. So in order to compensate for this we are sending Error notification each time the order notification can’t be sent, we are sending this Order Webhook Error Event so that you can identify the problem and react accordingly. To get this information, please subscribe to this event. This is the case that usually happens and created error
- Missing Menu Mapping
How to handle:
When there are error notification sent containing error type “missing_menu_mapping” you can handle this with notification to merchant saying that they are missing their menu mapping and they need to resync the menu via API so that future order won’t have this problem anymore
Example response:
{
  "body": {
    "error_type": "mapping_not_found",
    "mapping_not_found": {
      "items": [],
      "variants": [
        {
          "name": "Paha atas"
        },
        {
          "name": "Paha bawah"
        }
      ]
    },
    "order": {
      "number": "F-12345678"
    },
    "outlet": {
      "external_outlet_id": "external-outlet-id",
      "id": "G12345678"
    }
  },
  "header": {
    "event_type": "gofood.order.webhook_error",
    "event_id": "67235bd0-c963-4c32-aca1-27a52ec963e5",
    "version": 1,
    "timestamp": "2023-03-29T14:15:22Z"
  }
}
There are several field to be checked:
- Error Type: this is what makes the order notification can’t be sent. Currently only have “mapping_not_found”. This error means that you need to resync your menu via API
- Items & Variants: this specify which item / variants that missing the mapping since it doesn’t have any external id inside
- Order Number: this specify which order number the error belongs to
Simulate GoFood Orders
We provide an API Simulator so you can simulate triggering an order on Sandbox without having to use consumer app, driver app and merchant app in Sandbox.
API Simulator will send a notification to your registered webhook URL, so you can see if an order successfully sent to your webhook URL.
Follow these instructions on how to simulate GoFood orders:
- Fill in your
- App ID/Client ID
- Partner ID
- Outlet ID
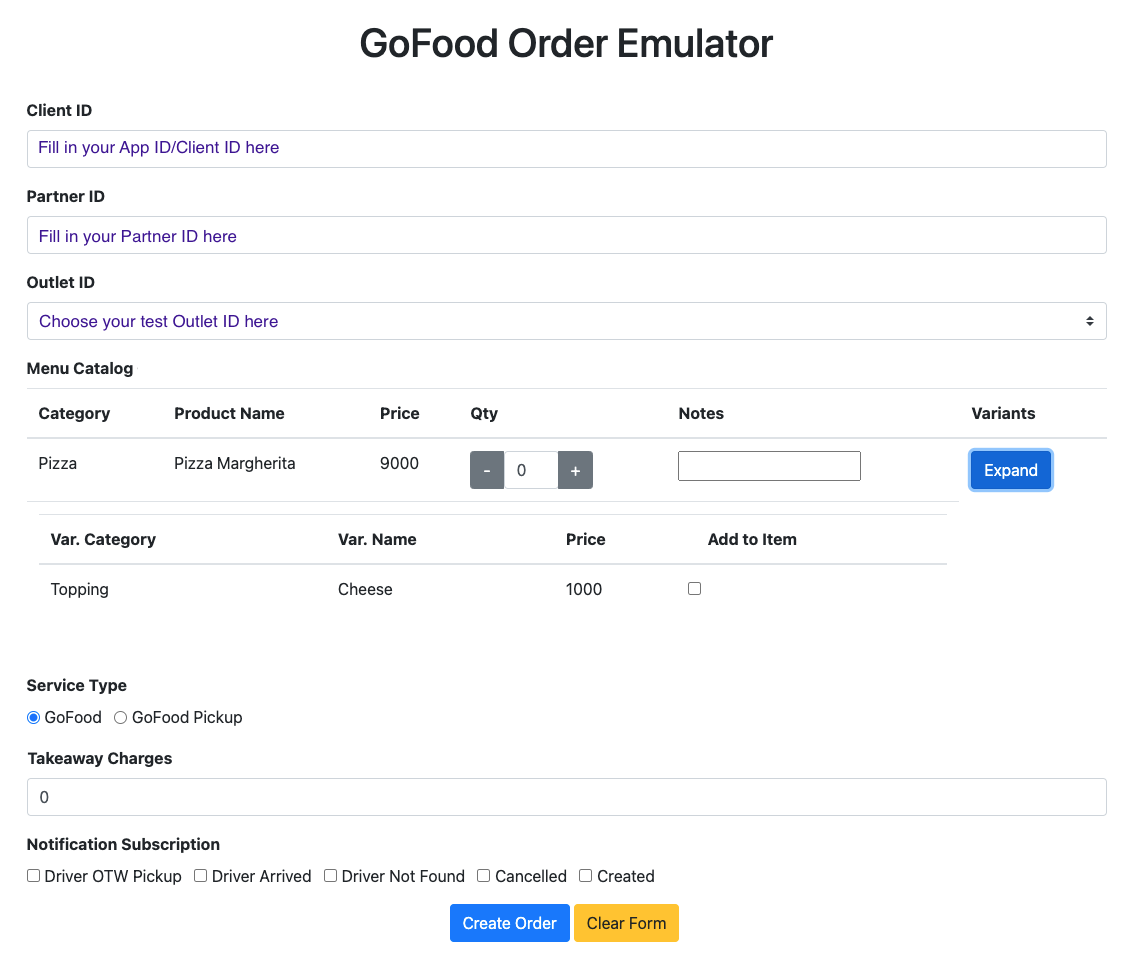
- Your menu set will be automatically reflected here - choose the menu, quantity, and order menu notes that you want to simulate
- Choose the menu variant that you want to simulate
- Choose the service type you want to simulate. GoFood is for driver delivery flow; GoFood pickup is for consumer self-pickup flow
- Choose the notification subscription that you want to simulate, you can choose multiple notifications. Make sure that you have already set up the webhook notifications beforehand
- Click create order to simulate the order. If it’s successful, then our emulator provides a successful response and you could see the webhook notification on your registered endpoint.
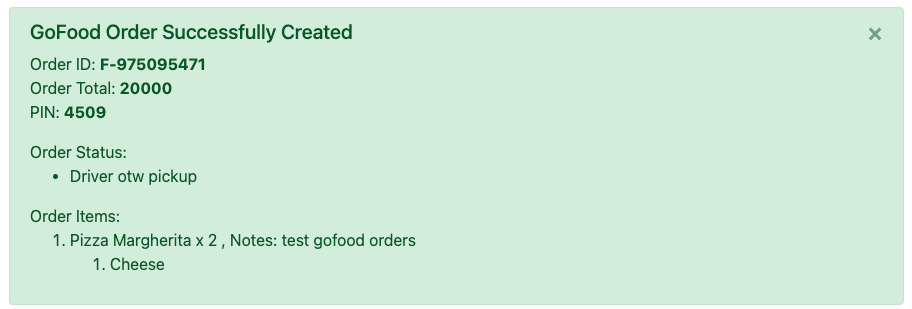
How to read this response?
- This is the order body response that you will receive on your POS system.
- PIN is required to complete the order. As merchant you need to give the PIN to the driver (on delivery flow) or to consumer (on pickup flow).
Setup SKU Promo
You can setup SKU Promo on your menu item using API. See this section to understand more on how to setup SKU Promo
Facilitator Model
Getting started (Facilitator)
To extend our API to broader segment, we now introduce Facilitator Model integration. It’s a capability that enable Food API integration to POS (Point of Sales) or OFA (Online Food Aggregator) services. If you’re a POS players and want to integrate to GoFood, please follow these guidelines to ease your integration.
Prior to doing integration, you need to be a GoBiz Partners. If you’re not a GoBiz Partners and want to do integration with us, Please reach out to us using this form.
Prior to integration, there are some pre-requisite requirements
You need to get credential with this scopes
- openid
- offline
- partner:outlet:read ; partner:outlet:write
- gofood:catalog:read ; gofood:catalog:write
- gofood:order:read ; gofood:order:write
- gofood:outlet:write
How to obtain credential?
- Contact us via this form and register yourself as GoBiz Partners
- Our team will contact you to explore your inquiry and perform further assessment
- Once you’ve completed our assessment, you’ll be able to get the credential from our team
Authentication
GoBiz is using standard OAuth2.0 authentication for integration with all of our partners. To complete the authentication process, the client must authorize itself to Gojek OAuth2 server. Consult this section for better understanding on how to do authentication
- Hit POST https://accounts.go-jek.com/oauth2/token to show GoBiz login page.
- From merchant point of view, this is the flow that they will get on their side
- User enters phone number
- System sends OTP to user phone number
- User inserts OTP
- System shows consent page to inform user what are data points that being accessible to partner
- User to click “Allow” or “Deny”

- When user click **Allow**, it means user successfully authenticates with system and authorizes the client to access information, system will generate an authorization code and redirect the user to
redirect_uriwith thecodeand thestatethat was originally sent by the client. On receiving this callback, client should verify thestateparameter and ensure the value is same as the one sent by the client in previous step. - The
codereturned in the previous step is one-time use only and is short-lived (no more than 2 minutes after receiving the redirection). Client should exchange thiscodeto receive an access token. - Link outlet ; you need to link your outlet so you can enable webhook notifications. This is the process to associate between your POS ID to GoBiz ID, so order notification can be relayed to correct outlet ID. Use the access token and call PUT /integrations/partner/v1/outlet-link
- Perform an auth mechanism to get `auth code` from your merchants, and exchange it to access token - see this step by step guideline
Manage Menu / Catalog Update
Prior to making call on catalog update endpoint, please make sure you understand how GoFood Menu is being structured - see this section for details
Get existing Menu
This step can be useful for your merchant to fetch all existing menu on their GoFood, merchant later can utilize it to decide which menu they want to update.
Please mind that you can also hit update menu directly, without having to get existing menu.
Use [GET] https://api.partner-sandbox.gobiz.co.id/integrations/gofood/outlets/{outlet_id}/v2/catalog as the endpoint When you get success response, you will receive all current active menus & variant categories on your existing outlet See this section for request & response detail
Update Menu
Use this endpoint to update your GoFood menu, please note that this is an overwrite operation, it means that menu and variants will be shown based on its latest API call.
- Use [PUT] https://api.partner-sandbox.gobiz.co.id/integrations/gofood/outlets/{outlet_id}/v1/catalog as the endpoint
- When you get success response, you’ll see your menu being reflected on your testing account
- See this section for request & response detail
Manage SKU promo
You can setup SKU Promo on your menu item using API. See this section to understand more on how to setup SKU Promo
Setup Webhook Notification (Facilitator)
In order to enable GoFood order relayed to your system, you need to subscribe to our webhooks. When you’re subscribing to an event (subscription is created) then a Gojek will trigger notification to the URL that you specified in the notification.
Learn more about it here
Handle Webhook Notification Error (Facilitator)
Sometimes webhook notifications might not be sent properly to you. So in order to compensate for this we are sending Error notification each time the order notification can’t be sent, we are sending this Order Webhook Error Event so that you can identify the problem and react accordingly. To get this information, please subscribe to this event. This is the case that usually happens and created error
- Missing Menu Mapping
How to handle:
When there are error notification sent containing error type “missing_menu_mapping” you can handle this with notification to merchant saying that they are missing their menu mapping and they need to resync the menu via API so that future order won’t have this problem anymore
Example response:
{
  "body": {
    "error_type": "mapping_not_found",
    "mapping_not_found": {
      "items": [],
      "variants": [
        {
          "name": "Paha atas"
        },
        {
          "name": "Paha bawah"
        }
      ]
    },
    "order": {
      "number": "F-12345678"
    },
    "outlet": {
      "external_outlet_id": "external-outlet-id",
      "id": "G12345678"
    }
  },
  "header": {
    "event_type": "gofood.order.webhook_error",
    "event_id": "67235bd0-c963-4c32-aca1-27a52ec963e5",
    "version": 1,
    "timestamp": "2023-03-29T14:15:22Z"
  }
}
There are several field to be checked:
- Error Type: this is what makes the order notification can’t be sent. Currently only have “mapping_not_found”. This error means that you need to resync your menu via API
- Items & Variants: this specify which item / variants that missing the mapping since it doesn’t have any external id inside
- Order Number: this specify which order number the error belongs to
How To
Menu Structure
Item
{
  "request_id": "{request_id_for_troubleshooting_purpose}",
  "menus": [
    {
      "name": "{menu_name}",
      "menu_items": [
        {
          "external_id": "{external_id_for_mapping_purpose}",
          "name": "{menu_item_name}",
          "internal_name": "{menu_item_internal_name}",
          "description": "{menu_item_description}",
          "in_stock": {true_or_false},
          "price": {menu_item_price_in_integer},
          "image": "{menu_item_image_url}",
          "operational_hours": {
            "sunday": [
              {
                "start": "{time_when_menu_should_start_shown_in_hh:mm_format}",
                "end": "{time_when_menu_should_stop_shown_in_hh:mm_format}"
              }
            ],
            "monday": [],
            "tuesday": [],
            "wednesday": [],
            "thursday": [],
            "friday": [],
            "saturday": []
          },
          "variant_category_external_ids": [
            "{variant_category_id}"
          ]
        }
      ]
    }
  ],
  "variant_categories": [
    {
      "external_id": "{variant_category_id}",
      "internal_name": "{variant_category_name_shown_in_gobiz_app}",
      "name": "{variant_category_name_shown_in_gojek_app}",
      "rules": {
        "selection": {
          "min_quantity": {minimum_selection_quantity_in_integer},
          "max_quantity": {maximum_selection_quantity_in_integer}
        }
      },
      "variants": [
        {
          "external_id": "{variant_id}",
          "name": "{variant_name}",
          "price": {price_addition_or_reduction_variant_in_integer},
          "in_stock": {true_or_false}
        }
      ]
    }
  ]
}
Item is the menu displayed on the respective GoFood outlet.
Item Rules and Info
| Rule and Info | Description |
|---|---|
| What’s the difference among - menus.name - menus.items.name - menus.items.internal_name |
- menus.name (string, required, max 150 chars): The name of the menu item collection. Sample: "Green Tea". - menus.items.name (string, required, max 150 chars): The name of the menu item to be shown in Gojek consumer app. Sample: "Thai Green Tea". - menus.items.internal_name (string, optional, max 200 chars): The name of the menu item to be shown in GoBiz app. Sample: "Thai Green Tea (A)". |
| Character limit on item name | 150 char |
| Character limit on item description | 200 char |
| Maximum image file size | 1 Mb with 1:1 aspect ratio |
What is external_id? |
Designated for mapping between Gojek item_id and Partner item_id i.e Cheese Burger on your system has ID B12345 where within Gojek system ID is eyJhbGciO |
| Is the price tax inclusive? | Yes |
| Do I need to do menu sync before I can start to receive order? | Yes |
| Operational hours - start | time when menu item should be start showing - timezone is following local store time |
| Operational hours - end | time when menu item should be stop showing - timezone is following local store time |
Menu Availability
You can set menu availability make set in_stock as true or false; You can also set menu availability by operational hours, this is useful if you have different menu sets on a particular shift i.e available menu for breakfast, dinner, and lunch.
Variant
"variant_categories": [
    {
      "external_id": "{variant_category_id}",
      "internal_name": "{variant_category_name_shown_in_gobiz_app}",
      "name": "{variant_category_name_shown_in_gojek_app}",
      "rules": {
        "selection": {
          "min_quantity": {minimum_selection_quantity_in_integer},
          "max_quantity": {maximum_selection_quantity_in_integer}
        }
      },
      "variants": [
        {
          "external_id": "{variant_id}",
          "name": "{variant_name}",
          "price": {price_addition_or_reduction_variant_in_integer},
          "in_stock": {true_or_false}
        }
      ]
    }
  ]
}
Variant is additional items that you can add on top of your menu item. We support Variant group and Variant Item
Variant category
Variant category is options that consumers can choose on top of Items. Example
- Sugar Level
- Topping
- Dressing Selection
Variant item
Variant item is options within a Variant category. Example
- Extra Sugar, Less Sugar, No Sugar
- Cheese, Pepperoni, Tuna, Basil, Anchovies
- Mayonnaise, Italian Sauce, Olive Oil, Mustard, Balsamiq, Thousand Island
Variant Rules
| Rule and Info | Description |
|---|---|
| Variant category type | Variant category can be set as mandatory or optional |
| Variant item price | Variant item price can be positive, zero, or negative |
| Max char for variant category name | 50 chars |
| Max character for variant item name | 50 chars |
| How to set variant item availability? | in_stock - you can set it true or false |
How to use this rule? |
min_quantity The minimum variant that the consumer can select. 0 means that the variant is optional. 1 or more means variant is mandatory, and consumer is required to pick one (or more) variant(s). max_quantity The maximum variant that the consumer can select. |
Variant Availability
Variant is available as long as variant items inside variant category is not out of stock, if all variant items within a variant category is out-of-stock, then variant is automatically out of stock.
See detailed request and response params and error response on API Reference
Sync Menu
After you understand the Item and variant structure, then you can sync food items to GoFood. Menu will be reflected immediately on your outlet once you made a successful request.
Please also mind that currently, we don’t do any menu moderation. Please make sure you’re making the correct request.
Sync Menu Flow

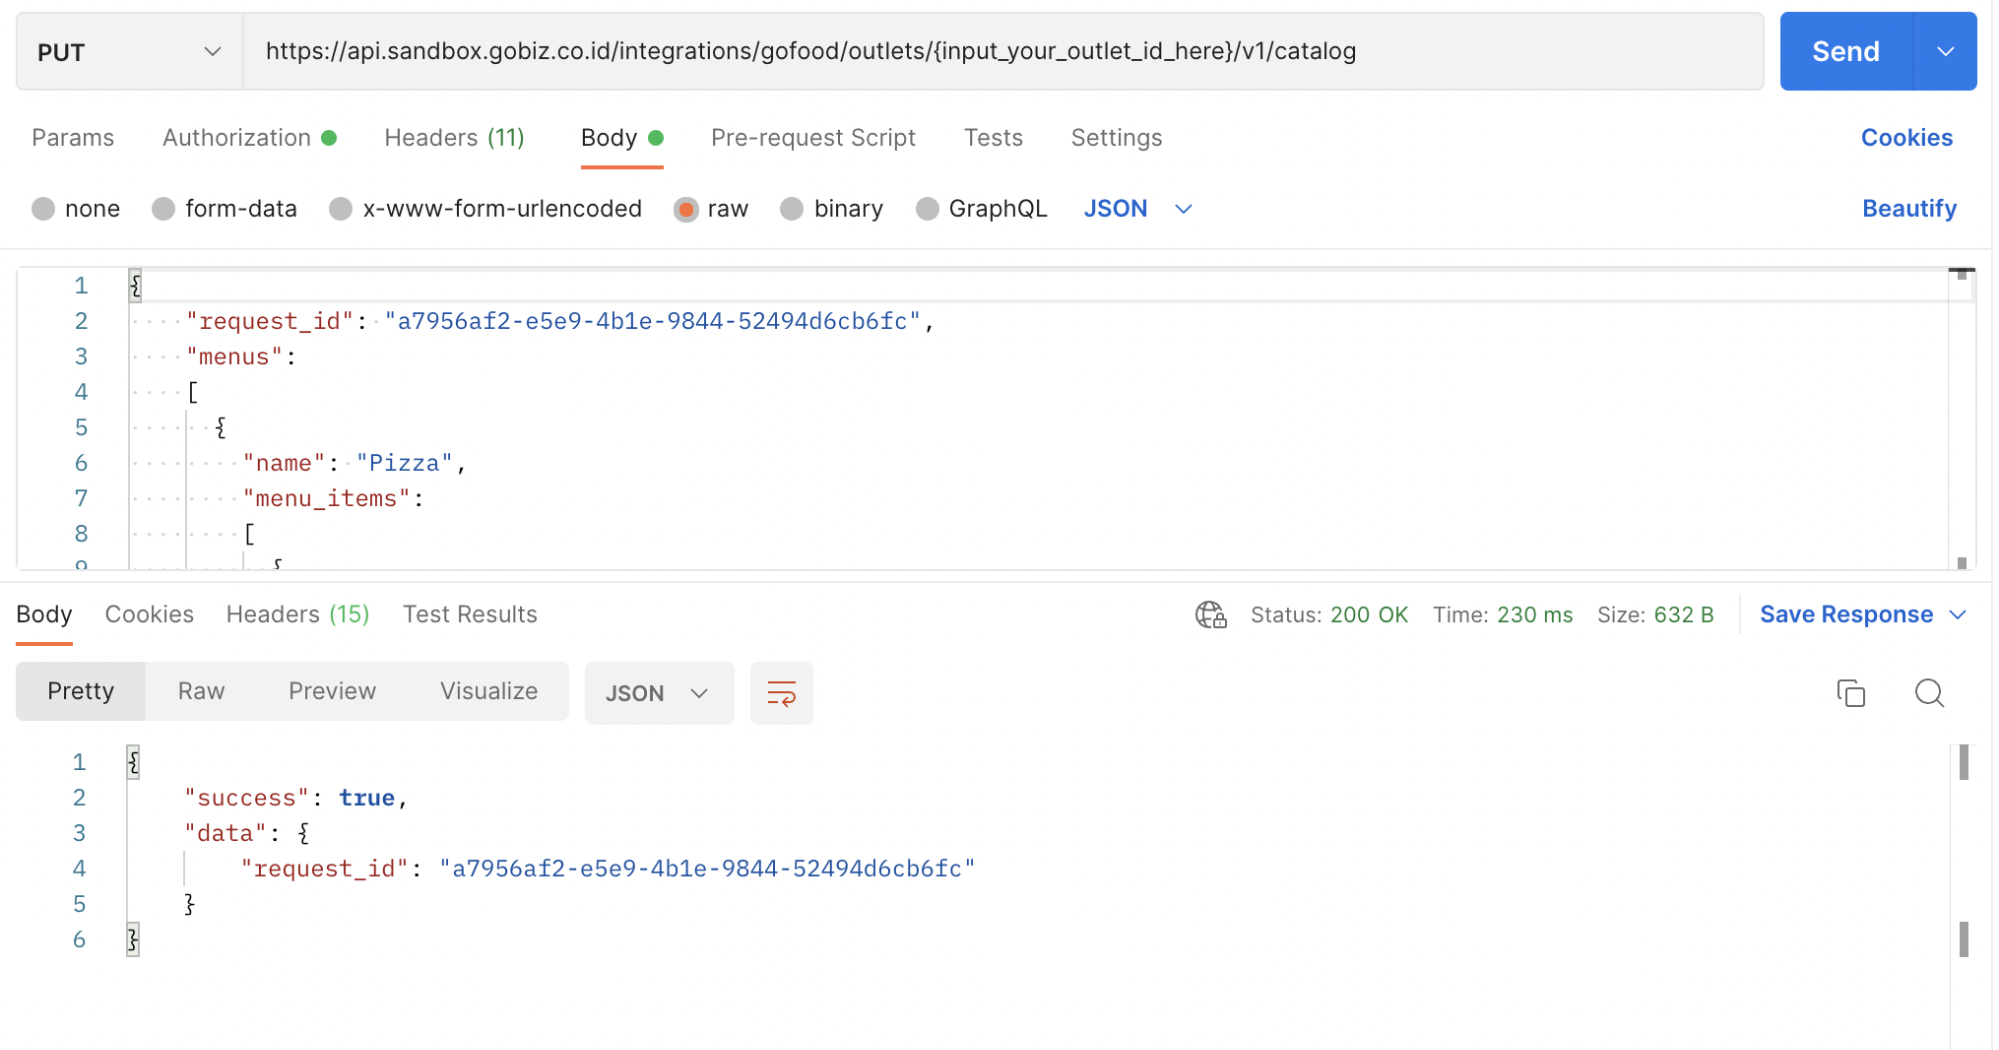
Sync Menu to outlet
Endpoint = PUT /integrations/gofood/outlets/{outlet_id}/v1/catalog
Request
curl -X PUT https://api.partner-sandbox.gobiz.co.id/integrations/gofood/outlets/{outlet_id}/v1/catalog \
-H 'Content-Type: application/json' \
-H 'Authorization: Bearer {access-token}' \
-d $'
{
"request_id": "a7956af2-e5e9-4b1e-9844-52494d6cb6fc",
"menus":
[
{
"name": "Pizza",
"menu_items":
[
{
"external_id": "XID",
"name": "Pizza Margherita",
"description": "Delicious Italian Pizza",
"in_stock": true,
"price": 9000,
"image": "http://gofood.co.id/some.png",
"operational_hours": {
"sunday":
[
{
"start": "00:00",
"end": "23:59"
}
],
"monday":
[
{
"start": "00:00",
"end": "23:59"
}
],
"tuesday":
[
{
"start": "00:00",
"end": "23:59"
}
],
"wednesday":
[
{
"start": "00:00",
"end": "23:59"
}
],
"thursday":
[
{
"start": "00:00",
"end": "23:59"
}
],
"friday":
[
{
"start": "00:00",
"end": "23:59"
}
],
"saturday":
[
{
"start": "00:00",
"end": "23:59"
}
]
},
"variant_category_external_ids":
[
"VC-XID"
]
}
]
}
],
"variant_categories":
[
{
"external_id": "VC-XID",
"internal_name": "Topping (promo)",
"name": "Topping",
"rules": {
 "selection": {
 "min_quantity": 1,
 "max_quantity": 2
}
},
"variants":
[
{
"external_id": "V-XID",
"name": "Cheese",
"price": 1000,
"in_stock": true
}
]
}
]
}
'
Response (200)
{
  "success": true,
  "data": {
    "request_id": "a7956af2-e5e9-4b1e-9844-52494d6cb6fc"
  }
}
To see how menu is reflected on consumer app - you can utilise your outlet testing web page (see sample here). Make sure menu, category, variants are in desired order.
Update Out of Stock Status
Beside using the Sync Menu flow, you can also utilise a specific API to mark items or variants as out of stock. The out of stock status will be reflected immediately on your outlet once you made a successful request.
Out of Stock Update Flow
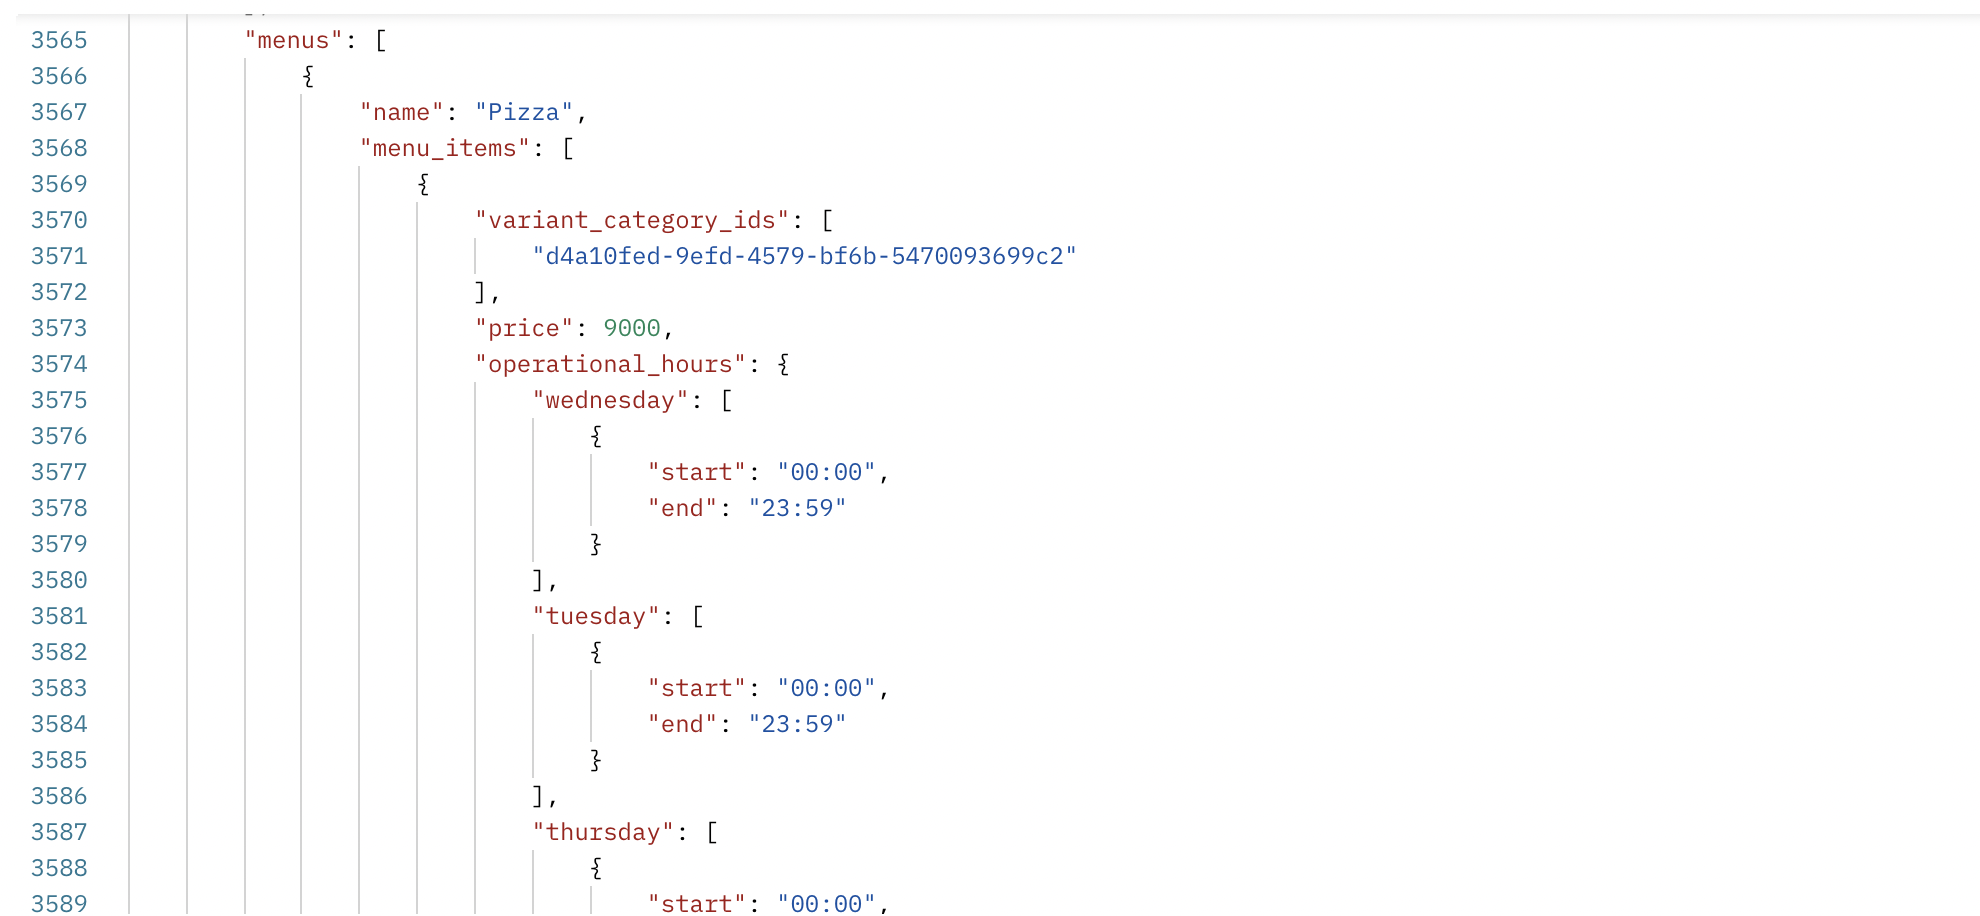
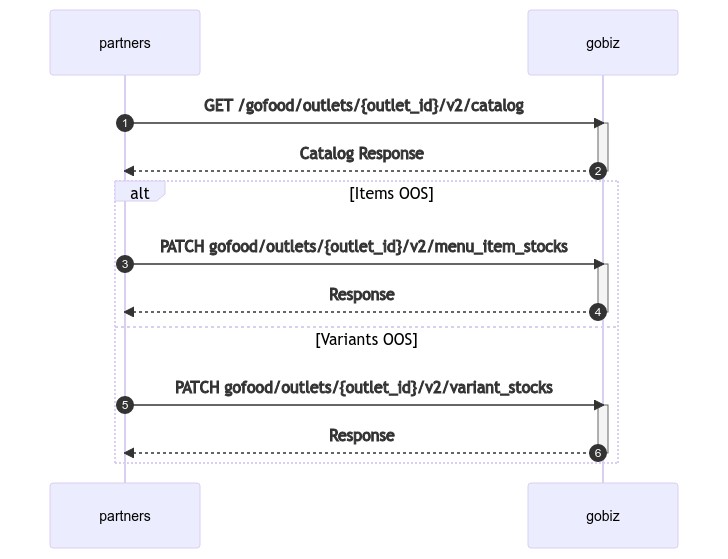 Before updating items or variants out of stock status, you will need to get the catalog of your outlet first by calling the GET catalog endpoint to retrieve the item or variant IDs (UUID format). The IDs need to be sent as request body when calling Items OOS endpoint & Variants OOS endpoint in order to proceed the request.
Get Catalog
Endpoint = GET /integrations/gofood/outlets/{outlet_id}/v2/catalog
Request
curl -X GET https://api.partner-sandbox.gobiz.co.id/integrations/gofood/outlets/{outlet_id}/v2/catalog \
  -H 'Content-Type: application/json' \
  -H 'Authorization: Bearer {access-token}'
Response (200)
{
    "success": true,
    "data": {
        "variant_categories": [
            {
                "variants": [
                    {
                        "price": 1000,
                        "name": "Garlic",
                        "in_stock": true,
                        "external_id": "V-XID",
                        "id": "be18dc03-e941-4238-8bba-bcd9b5e554fc"
                    }
                ],
                "rules": {
                    "selection": {
                        "min_quantity": 1,
                        "max_quantity": 2
                    }
                },
                "name": "Topping",
                "internal_name": "Topping (promo)",
                "id": "bb447057-4572-46f6-a97c-2e6478d98ac2"
            },
            {
                "variants": [],
                "rules": {
                    "selection": {
                        "min_quantity": 1,
                        "max_quantity": 2
                    }
                },
                "name": "Topping",
                "internal_name": "Topping (non-promo)",
                "id": "3234fd3a-151e-46bb-9a88-b2a682932393"
            }
        ],
        "menus": [
            {
                "name": "test food",
                "menu_items": [
                    {
                        "variant_category_ids": [
                            "bb447057-4572-46f6-a97c-2e6478d98ac2"
                        ],
                        "price": 12000,
                        "operational_hours": {
                            "wednesday": [
                                {
                                    "start": "00:00",
                                    "end": "23:59"
                                }
                            ],
                            "tuesday": [
                                {
                                    "start": "00:00",
                                    "end": "23:59"
                                }
                            ],
                            "thursday": [
                                {
                                    "start": "00:00",
                                    "end": "23:59"
                                }
                            ],
                            "sunday": [
                                {
                                    "start": "00:00",
                                    "end": "23:59"
                                }
                            ],
                            "saturday": [
                                {
                                    "start": "00:00",
                                    "end": "23:59"
                                }
                            ],
                            "monday": [
                                {
                                    "start": "00:00",
                                    "end": "23:59"
                                }
                            ],
                            "friday": [
                                {
                                    "start": "00:00",
                                    "end": "23:59"
                                }
                            ]
                        },
                        "name": "girish test release",
                        "in_stock": true,
                        "image": "https://i-integration.gojekapi.com/darkroom/gofood-indonesia/v2/images/uploads/0c957da0-373a-4353-be73-a3cc702d9aa1_e649465b-369d-4271-84e2-12674e005ef3_Go-Resto_20180703_065512.jpg",
                        "id": "cc3d0c9f-47ff-4871-8443-348591437e92",
                        "external_id": "XID",
                        "description": "testing"
                    }
                ]
            }
        ]
    }
}
Mark Items as Out of Stock
Endpoint = PATCH /integrations/gofood/outlets/{outlet_id}/v2/menu_item_stocks
Request
curl -X PATCH https://api.partner-sandbox.gobiz.co.id/integrations/gofood/outlets/{outlet_id}/v2/menu_item_stocks
  -H 'Content-Type: application/json' \
  -H 'Authorization: Bearer {access-token}' \
  -d $'
  [
      {
          "external_id": "XID",
          "in_stock": true
      }
  ]
  '
Response (200)
{
    "success": true,
    "data": {}
}
Mark Variants as Out of Stock
Endpoint = PATCH /integrations/gofood/outlets/{outlet_id}/v2/variant_stocks
Request
curl -X PATCH https://api.partner-sandbox.gobiz.co.id/integrations/gofood/outlets/{outlet_id}/v2/variant_stocks
  -H 'Content-Type: application/json' \
  -H 'Authorization: Bearer {access-token}' \
  -d $'
  [
      {
          "external_id": "V-XID",
          "in_stock": true
      }
  ]
  '
Response (200)
{
    "success": true,
    "data": {}
}
To see how menu is reflected on consumer app - you can utilise your outlet testing web page (see sample here). Make sure menu, category, variants are in desired order.
Order Acceptance
When a GoFood consumer places an order in GoFood, the system will trigger notifications which then you can subscribe onto via webhooks.
Subscribe to order notification event
In order to get the orders flowing to your system, you will need to subscribe to notification event. You are allowed to subscribe to multiple events (depending on your needs). When you’re subscribing to an event (subscription is created) then a specific event occurs, an HTTP request is made to the URL specified in the notification.
Create a subscription
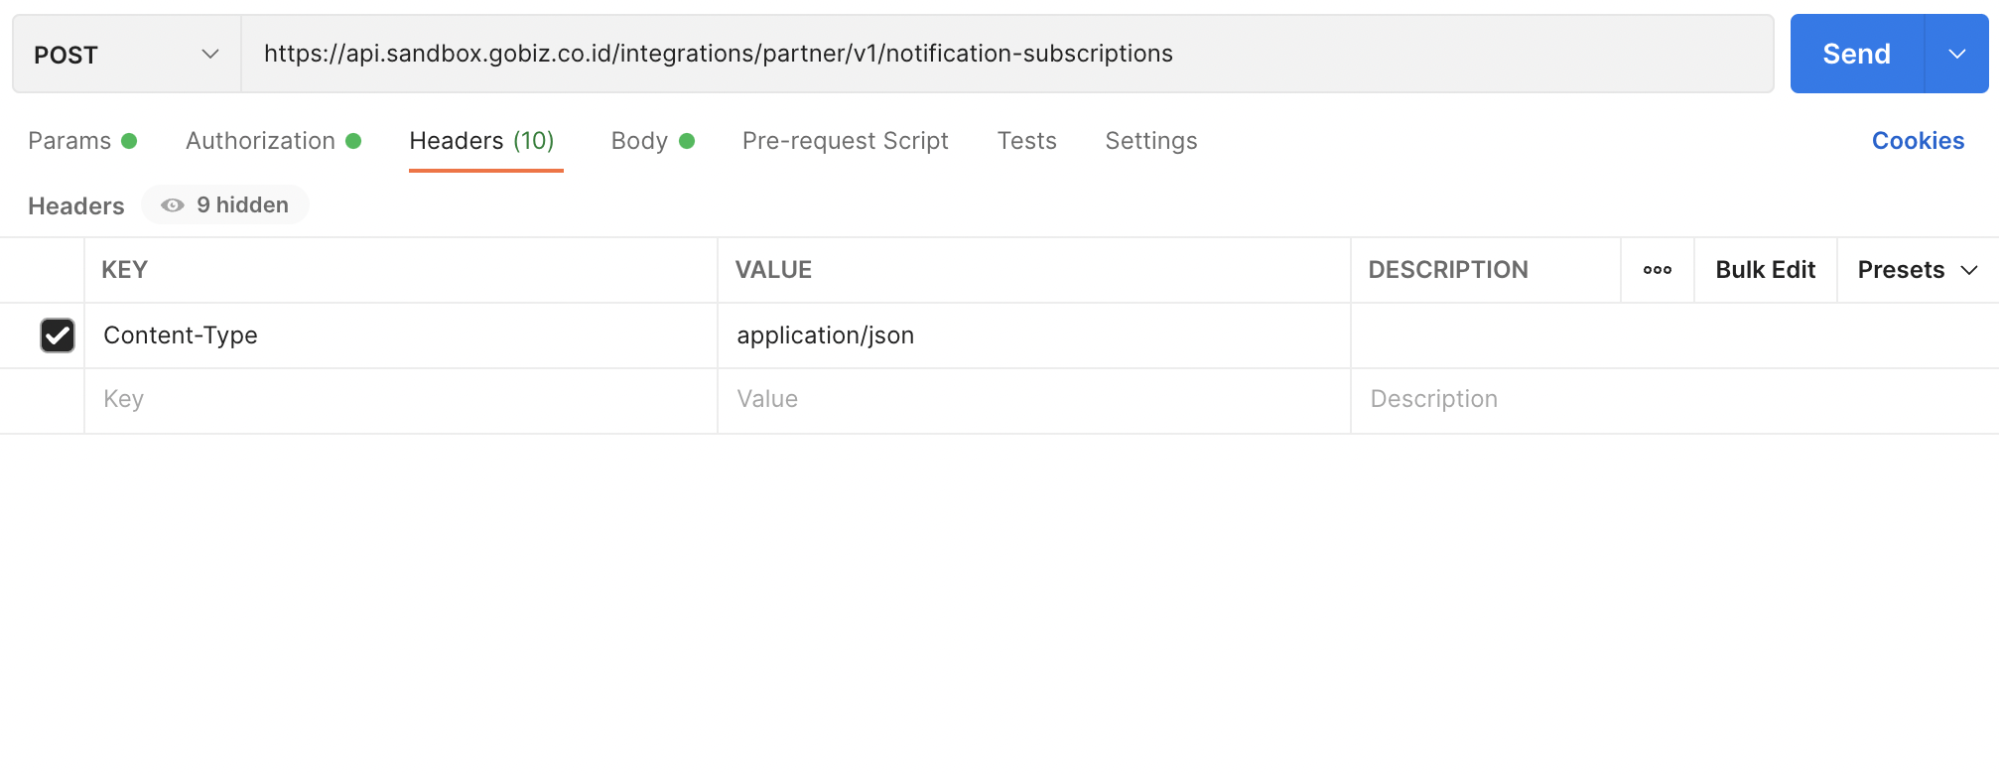
This is the step to register your webhook URL, where we’ll send notification to
Endpoint = POST /integrations/partner/v1/notification-subscriptions
Sample Request
curl -X POST https://api.partner-sandbox.gobiz.co.id/integrations/partner/v1/notification-subscriptions \
  -H 'Content-Type: application/json' \
  -H 'Authorization: Bearer {access-token}' \
  -d $'
  {
    "event": "gofood.order.driver_arrived",
    "url": "https://sample-endpoint.com/notifications",
    "active": true
  }
  '
Sample Response (200)
{
  "success": true,
  "data": {
    "subscription": {
      "id": "96f614f6-745e-47f5-ad68-c0c8e9ba8dc8",
      "event": "gofood.order.driver_arrived",
      "url": "https://sample-endpoint.com/notifications",
      "active": true,
      "created_at": "2019-08-24T14:15:22Z",
    }
  }
}
Notification Subscription Events
You can subscribe to one (or more) notification events depending on your need. Here are quick summary of each notification events.
| Order status | Notification Events | Description |
|---|---|---|
| Awaiting Merchant Acceptance | gofood.order.awaiting_merchant_acceptance | Get notified when an order is waiting for merchant acceptance (accept/reject) ; this is mandatory event if you’re using Manual Acceptance / Auto Accept on Timeout |
| Merchant Accepted | gofood.order.merchant_accepted | Get notified when an order is accepted |
| Cancelled | gofood.order.cancelled | Get notified when an order is cancelled |
| Completed | gofood.order.completed | Get notified when an order is completed |
| Catalog Menu Mapping Updated | gofood.catalog.menu_mapping_updated | Get notified when update menu process is completed |
| Driver Pickup | gofood.order.driver_otw_pickup | Get notified when a driver is being assigned to the specific order and otw to outlet |
| Driver Arrived | gofood.order.driver_arrived | Get notified when a driver is arrived to the outlet |
See detailed available notification events and error response on API Reference
Sample Order Notification Payload
{
    "header": {
        "version": 1,
        "timestamp": "2019-11-04T14:15:02.557+07:00",
        "event_name": "gofood.order.driver_otw_pickup",
        "event_id": "ca5c865a-0a36-3c39-9b88-348f97c1ff61"
    },
    "body": {
        "service_type": "gofood",
        "outlet": {
            "id": "M008272",
            "external_outlet_id": "1"
        },
        "customer": {
            "id": "F3109D097E3235C9100CE7D1FCD92C10",
            "name": "Jane Doe"
        },
        "order": {
            "status": "DRIVER_OTW_PICKUP",
            "pin": "8832",
            "order_total": 200000,
            "order_number": "F-175674194",
            "order_items": [{
                "quantity": 1,
                "price": 2.0e4,
                "notes": "",
                "name": "Iced Coffee Jelly Float",
                "id": "fe6178cb-fdf5-4c42-bc95-ac6b32e576a8",
                "external_id": "123",
                "variants": [{
                        "id": "7bbfaec2-a33d-4278-a200-ee6d9c862f6a",
                        "name": "Less Sugar",
                        "external_id": "variant-123"
                    },
                    {
                        "id": "58bfb0db-8542-45a8-96c8-77cd7140b452",
                        "name": "Less Ice",
                        "external_id": "variant-345"
                    }
                ]
            }],
            "currency": "IDR",
            "takeaway_charges": 0.0,
            "created_at": "2019-11-04T14:15:00.277+07:00",
            "applied_promotions": [{
                    "scope": "cart",
                    "detail": {
                        "redeemed_amount": 35000,
                        "merchant_budget_share_percentage": 25
                    }
                },
                {
                    "scope": "delivery",
                    "detail": {
                        "redeemed_amount": 9000,
                        "merchant_budget_share_percentage": 0
                    }
                },
                {
                    "scope": "sku",
                    "detail": {
                        "item": {
                            "id": "65717e66-3792-4053-ae10-e34be0784dcb",
                            "external_id": "MPR526277763"
                        },
                        "id": "019acaee-144d-483b-b1fa-c4fced5efc37"
                    }
                }
            ]
        },
        "driver": {
            "name": "John Doe"
        }
    }
}
Managing Order Acceptance
GoFood currently offers 3 types of order acceptance
- Auto Accept
- Manual Acceptance
- Auto accept on timeout
Please note that Auto Accept currently only available for Direct Integration ; Auto Accept is not available for Facilitator Model
Order Acceptance Types
| Auto Accept | Manual Acceptance | Auto Accept on Timeout | |
|---|---|---|---|
| Order State Lifecycle | |||
| What is it? | Order automatically accepted when a customer place order |
|
Auto-accept the order after 60 seconds instead of time-out |
| How | In auto-accept flow, order is automatically accepted and driver is dispatched after 10s |
*If you’re using Manual Acceptance, please subscribe to gofood.order.awaiting_merchant_acceptance webhooks
In manual flow, merchant can manually accept or reject the order. When the new order is placed, on merchant app the order keeps ringing continuously and merchant has two CTAs - “Reject” or “Accept”
When the order is ignored until 3 minutes, it gets timed-out and status changes to cancelled. |
*If you’re using Auto Accept on Timeout flow, please subscribe to gofood.order.awaiting_merchant_acceptance webhooks
In the auto-accept on timeout flow, we provide merchants with 60 seconds timer to manually accept or reject the order. When the new order is placed, on merchant app the order keeps ringing continuously and merchant has two CTAs - “Reject” or “Accept”
|
| API flow |
|
|
Mark Food Ready (MFR)
Mark Food Ready is an endpoint that you’ll need to hit whenever you’re completing preparing the Food. it applies to both Delivery or Pickup. It helps driver/consumer to get more accurate timing to pickup the Food.
Endpoint = PUT /integrations/gofood/outlets/:outlet_id/v1/orders/:order_type/:order_number/food-prepared
order_type can be either delivery or pickup
Sample Request
curl -X PUT https://api.partner-sandbox.gobiz.co.id/integrations/gofood/outlets/{outlet_id}/v1/orders/{order_type}/{order_number}/food-prepared \
  -H 'Content-Type: application/json' \
  -H 'Authorization: Bearer {access-token}' \
  -d $'
  {
    "country_code" : "ID"
  }
  '
order_type can be either delivery or pickup
Sample Response (200)
{
  "success" : true,
  "data" : {}
}
Order FAQ
| No | Questions | Answers |
|---|---|---|
| 1 | When I already use API Integration, do I still need to use GoBiz App? | As you integrated, orders will flow directly to your POS system. Then it will reduce dependency to you to use GoBiz App. However, we recommend you to keep GoBiz app as backup solution. |
| 2 | Does the price on order payload is including tax calculation? | Yes - the price is always tax inclusive |
| 3 | Does the price on order payload is including promo price? | No - there’s promo/discount amount on order payload (see applied_promotions that separated from order_total |
| 4 | Can I subscribe to more than 1 order notification? | Yes |
| 5 | What happens to order with driver change? | We’ll send you notification with same order id on this situation. |
GoFood Order State
Background
As all events need to have subscribed on self serve basis, so all of the detail of order state needs to be clear so that there are no issue that is raised because of wrong subscription on the order notification or wrong handling regarding each order notification event
State of Gofood Order
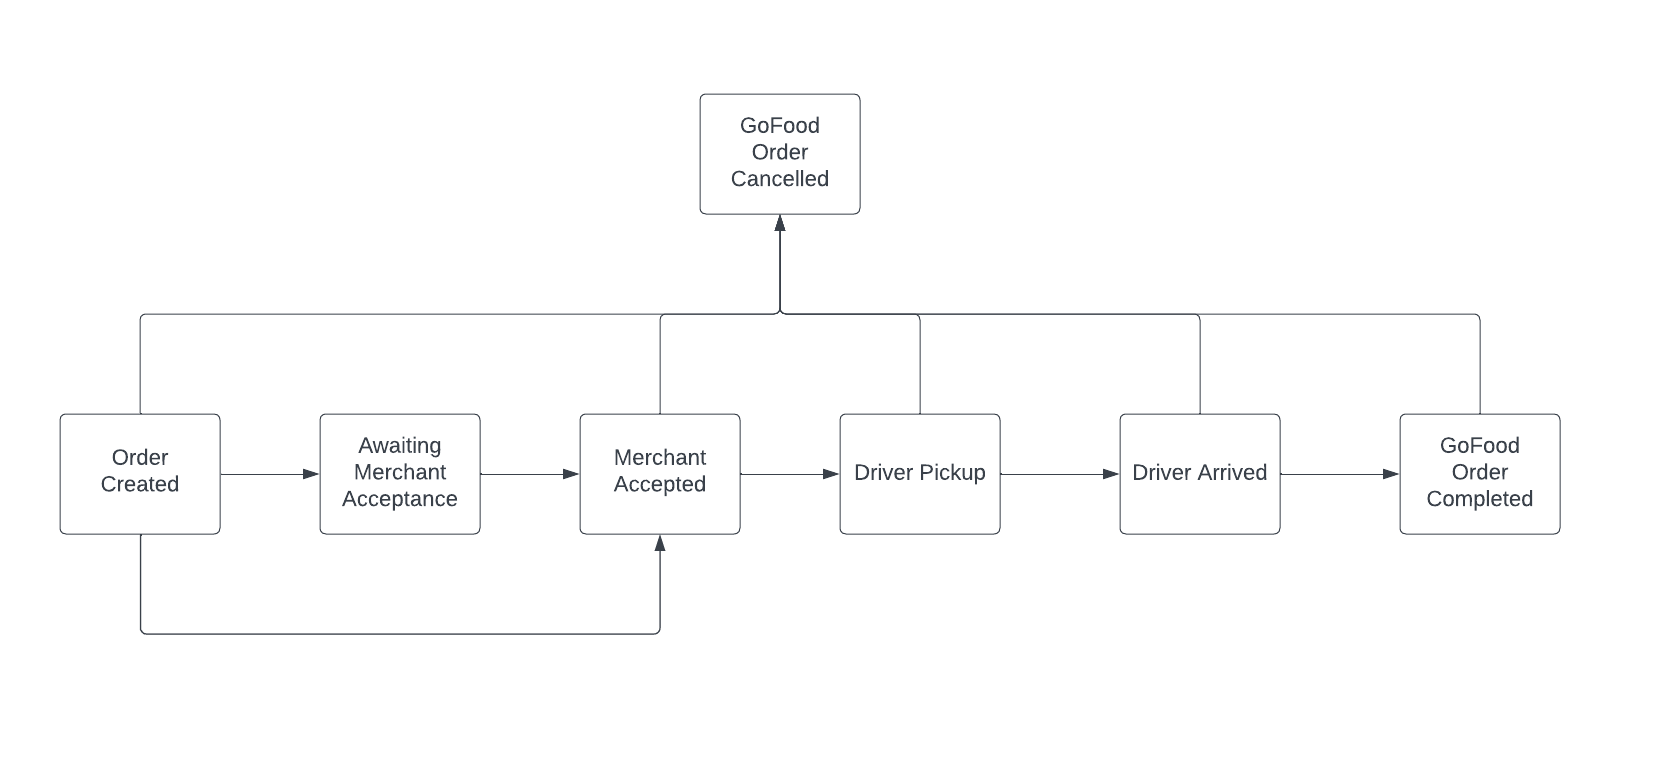
Information of each order states:
- Order Created State where the user placed order to merchants Note: not available to subscribe anymore since this is unrelated to merchants, please change your subscription to Awaiting Merchant Acceptance or Merchant Accepted
- Awaiting Merchant Acceptance
State where merchant are given options when they can reject the order or accept the order. There are 2 different time window when merchant’s are on this state
- 1 Minute if order acceptance are Auto Accept on Timeout, after 1 minute has passed without reaction then the order will be automatically accepted
- 3 Minute if order acceptance are Manual Acceptance, after 3 minutes has passed without reaction then the order will be automatically rejected
- If the merchant are on Auto Accept mode, then this state won’t be happening since after order created, the state will be automatically changed to Merchant Accepted
- Merchant Accepted
State where the merchant accepted the order
- Triggered when the merchants clicks accept button on both Auto Accept on Timeout and Manual Acceptance
- Will be automatically triggered if merchants are on Auto Accept mode
- Driver Pickup
- Triggered when the driver is already picking up the order and on their way to the restaurant
- Driver Arrived
- Triggered when the driver arrived at the restaurant
- GoFood Order Completed
- Triggered when the driver already completed the order, and finished on delivering the food to user
- GoFood Order Cancelled
- Triggered when there are cancellation orders request from user
Order Simulation (Case 1 Order Success)
- User order food on 1.00 PM
- Order Accepted on 1.01 PM
- Driver Pickup on 1.15 PM
- Driver Arrived at resto on 1.20 PM
- Order successfully delivered to user on 1.40 PM
Order Notification (Case 1 Order Success)
MERCHANT_ACCEPTEDwill be sent on 1.01 PMDRIVER_OTW_PICKUPwill be sent on 1.15 PMDRIVER_ARRIVEDwill be sent on 1.20 PMGOFOOD_ORDER_COMPLETEDwill be sent on 1.40 PM
*Technically order_created event is not necessary for merchant, since it just signifies on when the user orders the food, but only MERCHANT_ACCEPTED that matters since this would signifies when the merchant should start on preparing the food.
Order Simulation (Case 2 Order Cancelled)
- User order food on 1.00 PM
- Order Accepted on 1.01 PM
- Order Cancelled on 1.08 PM
Order Notification (Case 2 Order Cancelled)
MERCHANT_ACCEPTEDwill be sent on 1.01 PMORDER_CANCELLEDwill be sent on 1.08 PM
SKU Promo
SKU promo is promo on single menu item. We allow you to create SKU promo specific to any outlet. You can create a promotion, view a list of promotions for a specific outlet, and also delete or deactivate a promotion.
Create Promo
Creating promo on specific menu on specific outlet.
Endpoint = POST /integrations/promo/outlets/{outlet_id}/v1/food-promos
Sample Request
curl -X POST https://api.partner-sandbox.gobiz.co.id/integrations/promo/outlets/{outlet_id}/v1/food-promos \
  -H 'Content-Type: application/json' \
  -H 'X-Request-ID: some-sample-request-id' \
  -H 'X-Idempotency-Key: 71839e9c944b40cebd318a76db666f36' \
  -H 'Authorization: Bearer {access-token}' \
  -d $'
  {
    "promo_type": "sku_promo",
    "promo_detail": {
      "start_date": "2020-09-04",
      "end_date": "2020-09-07",
      "selling_price": 2500,
      "external_menu_id": "external_menu_id"
    }
  }
  '
Sample Response (200)
{
  "success": true,
  "data": {
    "success": [
      {
        "id": "promotion_id",
        "external_menu_id": "external-menu-id",
        "errors": null
      }
    ],
    "failure": [
      {
        "id": null,
        "external_menu_id": "external-menu-id",
        "errors": "Item is not active"
      }
    ]
  }
}
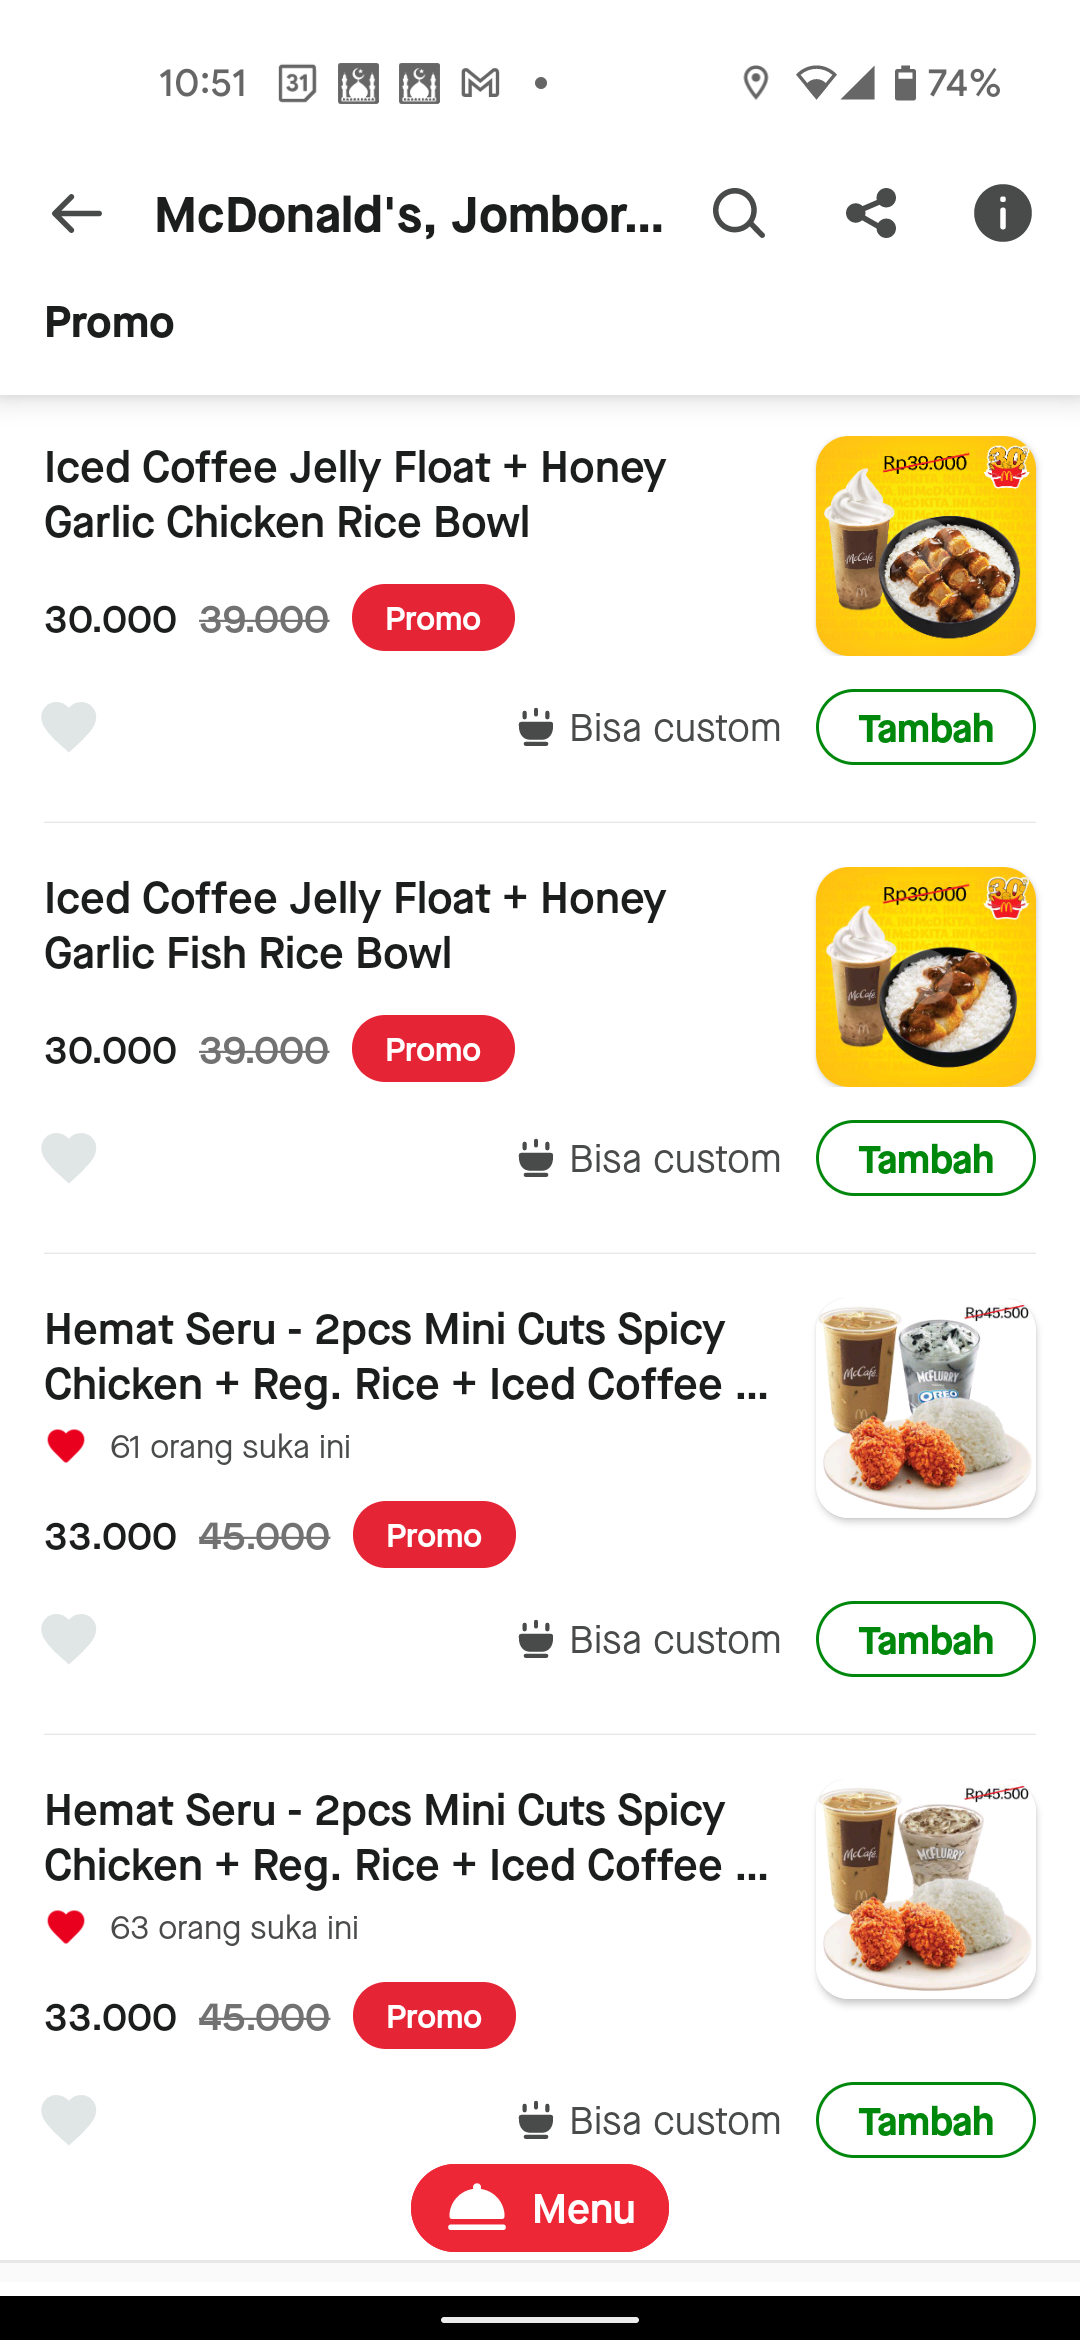
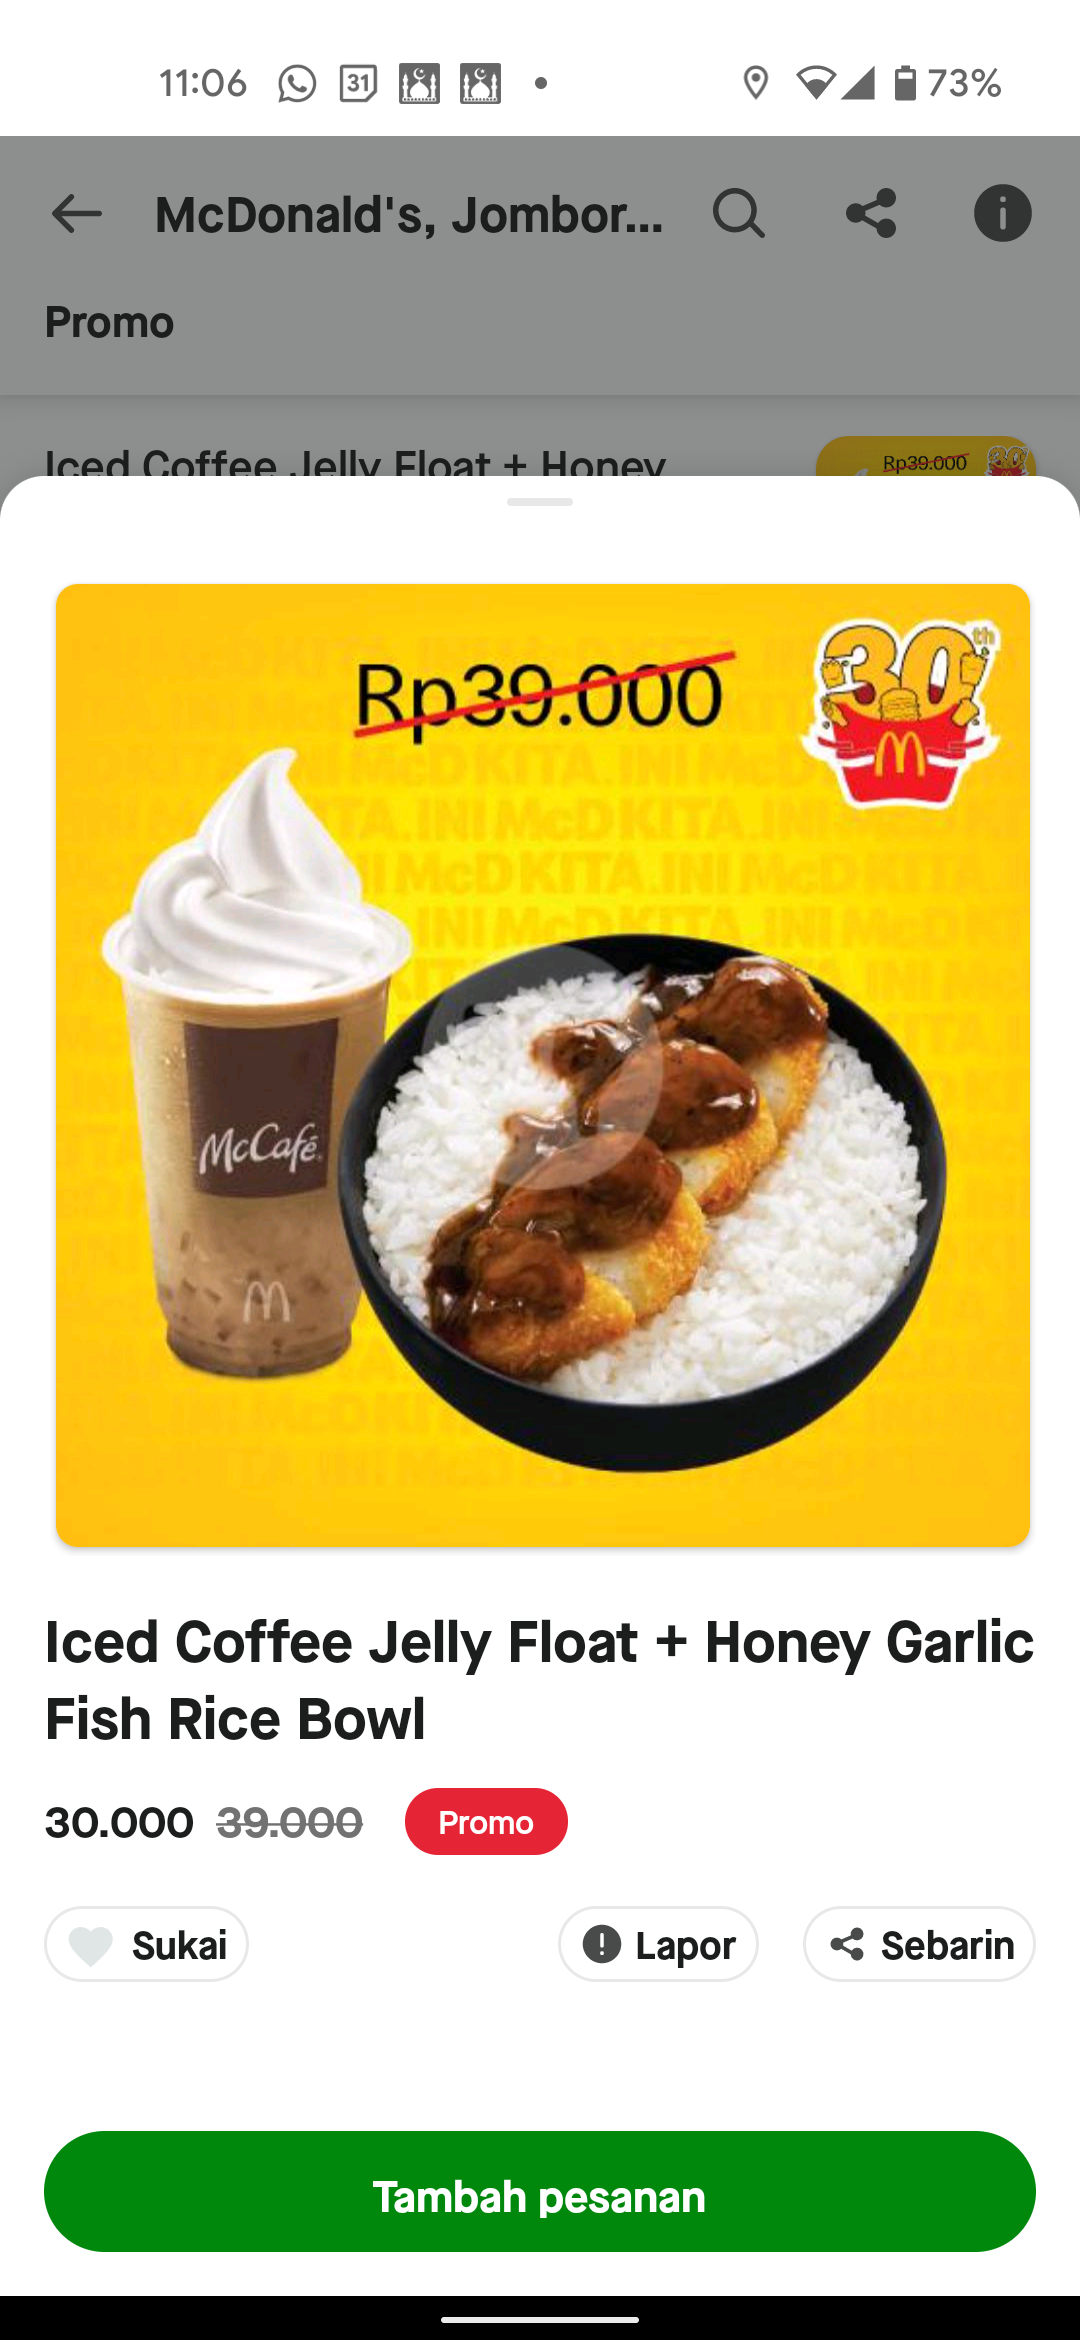
How SKU Promo looks like on Consumer App?
 |
 |
|---|
Get List of Promo
This method allows you to retrieve the list of promotions for a specific outlet.
Endpoint = GET /integrations/promo/outlets/{outlet_id}/v1/food-promos
Sample Request
curl -X GET https://api.partner-sandbox.gobiz.co.id/enterprises/{enterprise_id}/outlets/{outlet_id}/promo/v1/food-promos \
  -H 'X-Request-ID: some-sample-request-id' \
  -H 'Authorization: Bearer {access-token}'
Sample Response (200)
{
  "success": true,
  "data": {
    "promotions": [
      {
        "start_date": "2020-09-04",
        "end_date": "2020-09-04",
        "status": "created",
        "id": "96f614f6-745e-47f5-ad68-c0c8e9ba8dc8"
      }
    ],
    "total_count": 100,
    "limit": 10,
    "page": 2
  }
}
Get Promo Detail
By using this method, you can get the detailed information about a specific promotion.
Endpoint = GET /integrations/promo/outlets/{outlet_id}/v1/food-promos/{promotion_id}
Sample Request
curl -X GET https://api.partner-sandbox.gobiz.co.id/integrations/promo/outlets/{outlet_id}/v1/food-promos/{promotion_id} \
  -H 'X-Request-ID: some-sample-request-id' \
  -H 'Authorization: Bearer {access-token}'
Sample Response (200)
{
  "success": true,
  "data": [
    {
      "id": "96f614f6-745e-47f5-ad68-c0c8e9ba8dc8",
      "start_date": "2020-09-04",
      "end_date": "2020-09-04",
      "status": "activated",
      "promo_type": "sku_promo",
      "details": {
        "menu_item": {
          "id": "45ba745f-745e-4568-ad68-c0c8e9ba8dc8",
          "external_menu_id": "external-menu-id",
          "name": "Kopi",
          "price": 4500,
          "discounted_price": 2500
        }
      }
    }
  ]
}
Promo FAQ
| No | Questions | Answers |
|---|---|---|
| 1 | What’s the minimum discount of promo? | Minimum discount of promo is 10% i.e - Original price = Rp 100.000 - Min discounted price = Rp 90.000 |
| 2 | Does the promo automatically ended at end_date | Yes |
Outlet Management
Open and Close Outlet
You can call this endpoint to open or close any outlets you own. Closing an outlet also means stopping orders to flow to your outlet.
Endpoint = PATCH /integrations/gofood/outlets/:outlet_id/v1/properties
Sample Request
curl -X PUT https://api.partner-sandbox.gobiz.co.id/integrations/gofood/outlets/{outlet_id}/v1/properties \
  -H 'Content-Type: application/json' \
  -H 'Authorization: Bearer {access-token}' \
  -d $'
  {
    "force_close": true
  }
  '
Sample Response (200)
{
  "success": true,
  "data": {
     "force_close": true
   }
}
Pay Integration
Pre-Requisite
Scope
You’ll need to have this scope on your credential
| Scope | Description |
|---|---|
payment:transaction:read |
To retrieve transactions |
payment:transaction:write |
To create/modify transactions |
Integration Use Case
Use-case on Pay integration is how you can accept QRIS-based payment on your own device. This approach eliminates the effort to invest in additional EDC machines on every outlet. Instead, you can show the QR on your current device (e.g show on your cashier monitor), or simply print a QR code on your existing EDC device. Each QR will associate with each transaction that you create. The customer then can pay using any available QR-based payment means.
Create Transaction
You can create a transaction using this endpoint. We’ll process the request and sends you the QR data. This QR data enables you to create the QR image and display it to the customer.
Endpoint = POST /integrations/payment/outlets/{outlet_id}/v2/transactions
Sample Request
curl -X POST https://api.sandbox.gobiz.co.id/integrations/payment/outlets/{outlet_id}/v2/transactions \
  -H 'Content-Type: application/json' \
  -H 'Idempotency-Key: string' \
  -H 'Authorization: Bearer {access-token}' \
  -d $'
  {
    "payment_type": "qris",
    "transaction_details": {
      "order_id": "order-1234",
      "gross_amount": 3000,
      "currency": "IDR"
    },
    "item_details": [
      {
        "id": "SKU-000123",
        "price": 3000,
        "quantity": 1,
        "name": "Item sample no.1",
        "brand": "sample brand",
        "category": "others",
        "merchant_name": null
      }
    ],
    "customer_details": {
      "first_name": "John",
      "last_name": "Doe",
      "email": "john@example.com",
      "phone": "+628111000123"
    }
  }
  '
Sample Response (200)
{
  "success": true,
  "data": {
    "outlet": {
      "id": "{gobiz_outlet_id}",
      "pop_id": "{id_of_pop_machine_given_by_gobiz}"
    },
    "transaction": {
      "id": "{transaction_id_in_uuid}",
      "payment_type": "{payment_mode_qris}",
      "status": "{transaction_status}",
      "qris_string": "{qr_data_to_display_the_QR_image_on_customer_side}",
      "order_id": "{order_id_of_the_transaction}",
      "gross_amount": {transaction_amount_in_IDR},
      "currency": "IDR",
      "created_at": "{ISO_8601_timestamp}",
      "settlement_at": null
    },
    "actions": [
      {
        "name": "generate-qr-code",
        "method": "GET",
        "url": "{URL_to_retrieve_qr_code}"
      }
    ]
  }
}
Get Transaction Detail
By using this method, you can view the details of a specific transaction.
Endpoint = GET /integrations/payment/outlets/{outlet_id}/v1/transactions/:transaction_id
Request
curl -X GET https://api.sandbox.gobiz.co.id/integrations/payment/outlets/{outlet_id}/v1/transactions/:transaction_id \
  -H 'Authorization: Bearer {access-token}'
Response (200)
{
  "success": true,
  "data": {
    "outlet": {
      "id": "{gobiz_outlet_id}",
      "pop_id": "{id_of_pop_machine_given_by_gobiz}"
    },
    "transaction": {
      "id": "{transaction_id_in_uuid}",
      "payment_type": "{payment_mode_qris}",
      "status": "{transaction_status}",
      "qris_string": "{qr_data_to_display_the_QR_image_on_customer_side}",
      "order_id": "{order_id_of_the_transaction}",
      "gross_amount": {transaction_amount_in_IDR},
      "currency": "IDR",
      "created_at": "{ISO_8601_timestamp}",
      "settlement_at": "{ISO_8601_timestamp}"
    },
    "actions": [
      {
        "name": "generate-qr-code",
        "method": "GET",
        "url": "{URL_to_retrieve_qr_code}"
      }
    ]
  }
}
Troubleshooting
Why do we need this?
Sometimes, when there are issue coming, our partners needs to raise it to specific slack channel for assistance. To reduce back-and-forth communication, we are providing tools to self-identify the issue and fix the issue whenever possible without having any dependency on us.
Get Notification Detail
Background
There are cases where our merchants didn’t get their order notifications. This might be because of promo setting, menu external ID didn’t get passed, wrong URL, etc. For some cases you can actually fix the issue yourself.
Example case:
- In Cases where the order notification is not sent because link that is connected to the webhook cannot be found, this means that we still sent the notification but the link cannot be reached because it’s non-existent or broken. This should be able to be solved by changing the link the the working one
- You can check if there are certain order state that is not sent (e.g merchant_accepted, driver_otw_pickup,etc) then you can track it using this debugging API
- You can utilize this API for your own analytics, and track end to end flow of an order, complete with their timestamp
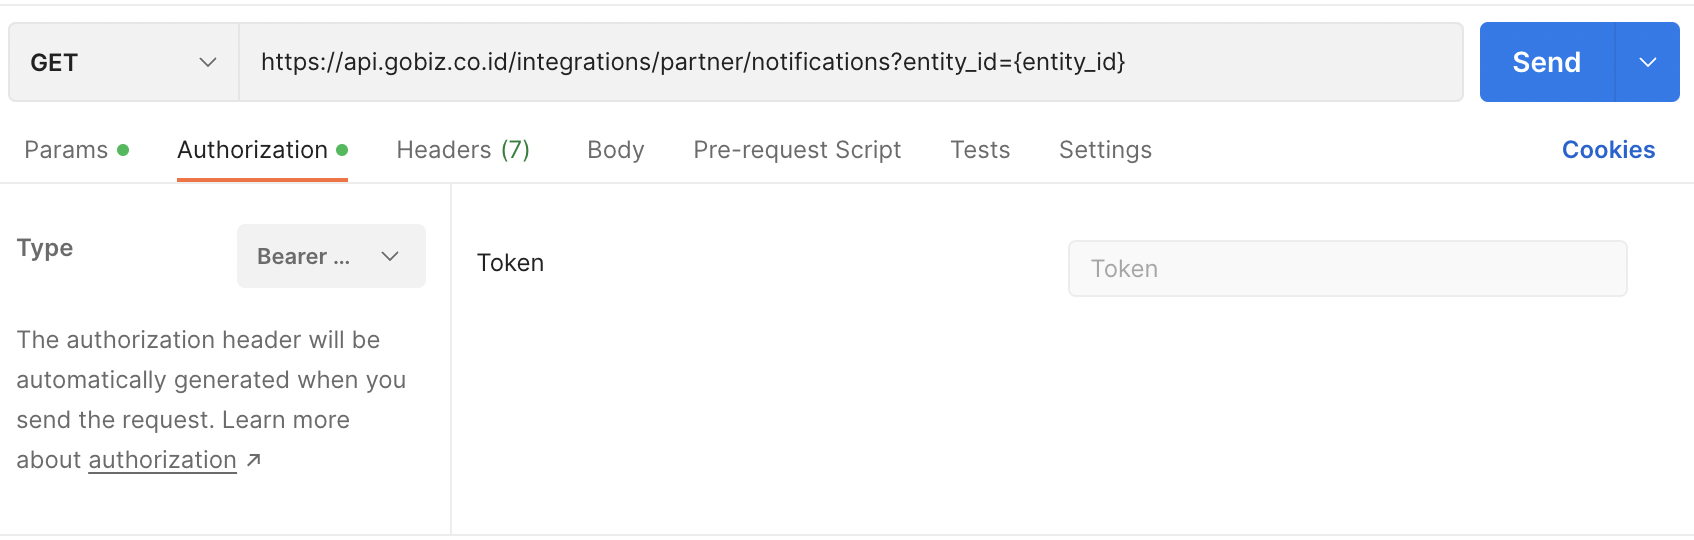
How to debug order notification issue?
-
Open this endpoint GET
{host}/integrations/partner/notifications?entity_id={entity_id}
Entity_ID details:-
If you’re GoFood / GoMart User, replace entity_id by order_id. Example:
https://api.gobiz.co.id/integrations/partner/notifications?entity_id=F-704173354
-
If you’re Gopay user replace entity_id by transaction_id. Example:
https://api.gobiz.co.id/integrations/partner/notifications?entity_id=c5fbc785-629a-463f-b6f9-da1106a29f73
-
If you’re GoFood / GoMart User, replace entity_id by order_id. Example:
-
Make sure that you’re using Client_credentials as method to get access token and put the access token with type Bearer Token on Authorization
-
Sample Request on curl
    curl -X GET {host}/integrations/partner/notifications?entity_id={entity_id} \
    -H 'Authorization: Bearer {access-token}'
-
Scope used: partner:outlet:read or outlet:read
-
Sample response (200)
    {
        "success": true,
        "data": {
            "notifications": [
                {
                    "entity_id": "F-704173354",
                    "created_at": "2023-05-03T16:11:50.446+00:00",
                    "partner_id": "c5fbc785-629a-463f-b6f9-da1106a29fa1",
                    "event_type": "gofood.order.merchant_accepted",
                    "delivery_status": "dead",
                    "endpoint": "https://webhook.site/5b8922ed-b310-456c-8ea2-9d7a0a9ba0f0",
                    "headers": {
                        "X-Go-Signature": "1158ebcb7e821406f0b4993a504d6d561177c494662dad890d651f94f3f08216",
                        "X-Go-Idempotency-Key": "446cb8ae-8fe3-3c2c-9e9f-c677f37c5e5c",
                        "Content-Type": "application/json",
                        "Accept": "application/json"
                    },
                    "payload": "stringified JSON of notification payload",
                    "history": [
                        {
                            "time": "2023-05-03T16:11:50.446+00:00",
                            "exception_message": "URL not found",
                            "delivered": false
                        },
                        {
                            "time": "2023-05-03T16:15:50.446+00:00",
                            "exception_message": "URL not found",
                            "delivered": false
                        },
                        {
                            "time": "2023-05-03T16:19:50.446+00:00",
                            "exception_message": "URL not found",
                            "delivered": false
                        },
                        {
                            "time": "2023-05-03T16:19:50.446+00:00",
                            "exception_message": "Failed after automatic attempts.",
                            "delivered": false
                        }
                    ]
                }
            ]
        }
    }
-
How to read the response above?
- Delivery status shows whether the webhook is dead or not (more detail on delivery status details) History shows that how many times the webhook are notified
- Inside History, there are :
- exception_message which shown what is wrong with the webhook
- delivered which shows whether the webhook has been successfully delivered or not
- In the case above, exception message shown “URL not found” means that the URL of your order cannot be found and you need to fix it.
Remarks
Should you need to check detailed request param, query param, error codes - please refer to API Reference. If you need further assistance regarding API Integration, please reach out to us via this form